This function is used to display and edit the affiliation between network features that are non-spatial and not mapped in the same position on the map. These associations are displayed on the map via connecting lines whose symbolism can be parameterized.
A utility network can have the following types of associations with corresponding association subtypes:
Containment Associations
Modeling a dense collection of features in a network as a single feature, such as contents of substations, switch gears, cable ducts.
Assignment subtypes:
•Contained in
•Contains Assets
Connectivity Associations
Connection between features that are not positionally equal or between spatial features and non-spatial junction and edge objects.
Assignment subtypes:
•Junction Junction
•Junction Edge

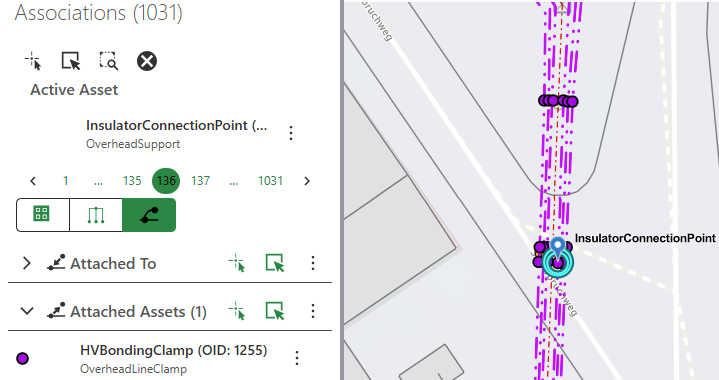
Structural Attachment Associations
Modeling of supporting structures and equipment in a network, e.g. a pole with transformer, grounding, riser and arrester as attachments.
Assignment subtypes:
•Attached to
•Attached Assets
For more information, see Esri's ArcGIS Pro Help.
To edit an association:
1.Go to Network > Associations.
In the left side panel, the Associations tab opens.
2.Select network features to view them using one of the following functions.
Button |
Description |
|---|---|
|
Load the desired map objects with a mouse click on a map object or by drawing a rectangle over a map area. When a map object is selected by clicking with the mouse, only one network feature is loaded at a time. If several network features are present at this position, the objects are loaded according to the following prioritization - depending on the geometry: |
|
Load the information on any network features already selected in the map from another step or with another selection function. Network features can be non-spatial. These can be selected and loaded from the Query builder by using the Table view setting from the action menu of the selected feature. This allows the creation of associations even for objects that do not have a geometry. |
|
Load the information about all network features present in the current map section. |
|
All selected network features and related information will be removed from the results list. |


Please note that a small-scale section may also output a lot of network features.
If existing network features with associations are not visible in the set scale, they cannot be loaded into the result list. The message "No network objects with associations found at the given location" appears. This behavior refers to the selection functions "Load identified map objects" and "Load map objects from extent".
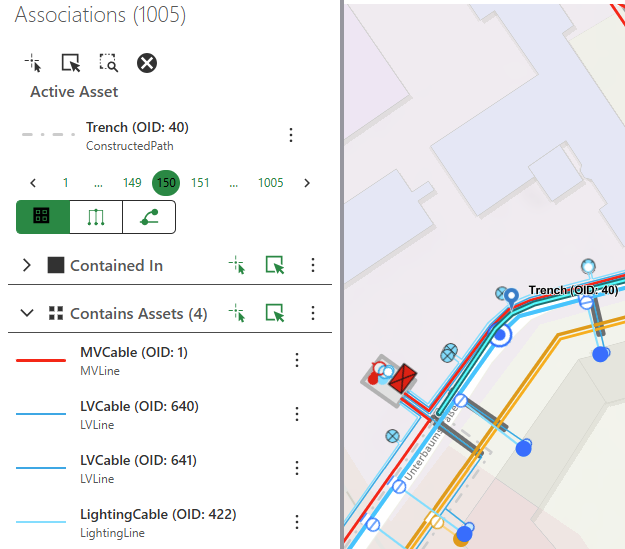
The loaded network features are displayed and classified according to their different association types. The association subtypes correspond to the above scheme.
The circular digit highlighted in green indicates that the information displayed below it belongs to this network feature.
This currently highlighted feature will be highlighted on the map.
3.Edit and/or delete associations for any of the listed assets, you can also Set Active individual assets from this result set in order to display nested content, for example. If an asset is set to active, it is added to the result set at the top and the associations for this asset can be displayed again.
You can perform some edit operations on your created/available associations by clicking on the action menu, the following functions appear:
Button |
Description |
|---|---|
|
Delete association. |
|
Zoom to the feature. |
|
Pan to the feature. |
|
Select Feature(s). |
Enable geometry editing of this feature. |
|
Enable attribute editing of this feature. |
|
|
Show associations for selected asset(s). |


Functions for editing association are also available at the association subtype level:
Button |
Description |
|---|---|
|
Create associations with identify assets. |
|
Create associations with preselected assets. |
4.Show or hide associations on the map by clicking on the eye symbol at the bottom of the panel.
5.Edit the settings for the association view on the map by clicking on the settings symbol at the bottom of the panel.
A dialog pops up where you can alter settings for associated features.
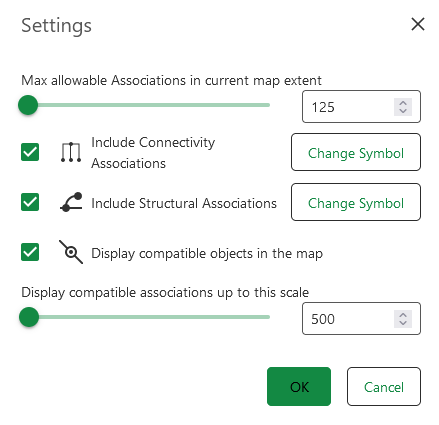
For a space-saving view, the compact view can be selected in the "Status bar" section.