Annotations are textual and symbolic labels that display important information about network features on the web map. They can help you understand, identify, and manage complex network elements.
To create an annotation:
1.Go to Edit > Annotations.
The Annotations tab opens.
2.Choose the layer and the annotation class from their respective drop-down menus, then type in the text to be displayed on the map.
To ensure the correct display of annotations on the map, zoom in to an appropriate scale.
Annotations are only visible when their associated layer is active and visible. Ensure that the layer is turned on in the Layer tab.
3.Place your newly created annotation on the map using one of the methods listed below.
Button |
Description |
|---|---|
|
Place the annotation at a certain spot, and drag the rotation bar to rotate the annotation if needed. |
|
Place the annotation between two selected lines along a drawn baseline. |
|
Place the annotation with a leaderline by choosing the spot you want the annotation to point to, then click the position where the annotation text should appear. |


4.Click on the map to place the annotation at the desired spot.
Your annotation is now created and saved to the web map.
Feature-Linked Annotations
Feature-Linked Annotations are annotation features that maintain a dynamic relationship with the features they describe. When the linked feature's attributes or geometry change, the annotation is automatically updated to remain consistent.
You can create feature-linked annotations only when the selected feature has the feature-linked annotations configured. To read more about creating feature-linked annotation feature classes, visit the Esri documentation.
To create a feature-linked annotation:
1.Go to Edit > Annotations.
The Annotations tab opens.
2.Toggle the Create feature-linked annotation button.
The selected feature is highlighted in the map.
3.Click Select feature, then click the feature on the map.
4.Choose the layer and the annotation class from their respective drop-down menus.
The text field shows the created annotation.
5.Click on the map to place the annotation at the desired spot.
Your annotation is now created and saved to the web map.
You can rotate the annotation to the desired angle before placement by dragging the Rotation bar or typing in the angle degree.
If you delete a feature, its feature-linked annotation is automatically deleted.
If the selected feature is a line feature, the annotation is automatically rotated to match its rotation angle before placement.
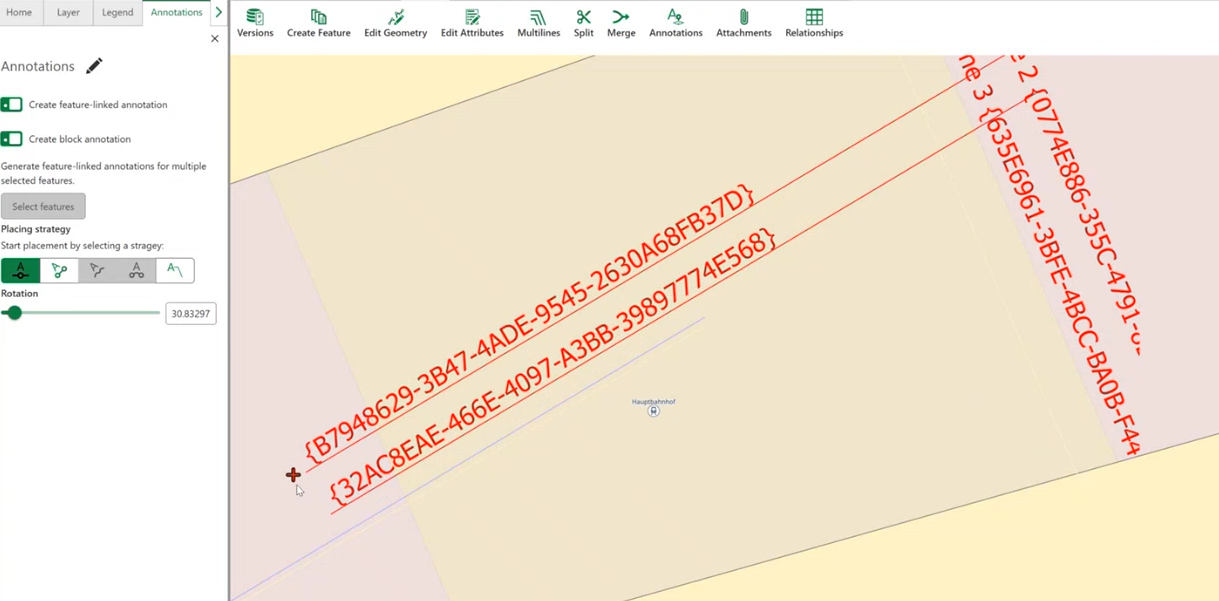
Block Annotations for Parallel Lines/Cables
Create multiple labels as a single text block for parallel line features.
To create a block annotation:
For a block annotation to be created, the selected feature must have a feature-linked annotation configuration.
1.Go to Edit > Annotations.
2.Enable Create feature-linked annotation.
3.Enable Create block annotation (located below the feature-linked option).
4.Click Select feature, then draw a line intersecting the required features.
5.Click on the map to place the annotation block at the desired spot.
Your block annotation is now created and saved to the web map.
In a block annotation text, features are ordered geographically to match their visual arrangement on the map.
When creating a block annotation, relationship rules of the selected feature are taken into account. If exactly one valid rule matches, that class is used; if multiple are valid, the first matching one is taken as default. The annotation class drop-down is filtered to only show classes valid for the selected feature's subtype.
When creating a block annotation with leaderlines, the system automatically places leaderline anchors at the intersection points, to point precisely to where the features intersect with the identified geometry. This way, you configure which annotation subtype is used as a default for which layer subtype. To read more, visit ArcGIS Pro documentation.
Block Annotations Behavior:
•Block annotations support only one line per feature-linked annotation.
•Block alignment follows the rotation of the placement location.
•Label order follows map orientation.
•Individual annotations within the block can be edited separately.
•Block annotations work with line, point, and area features.
Block annotations use the first available annotation layer and its first annotation class.