Intervals dictate the criteria a maintenance strategy uses to generate orders. A maintenance strategy could have one or multiple intervals added to it depending on the kind of maintenance the affected devices require.
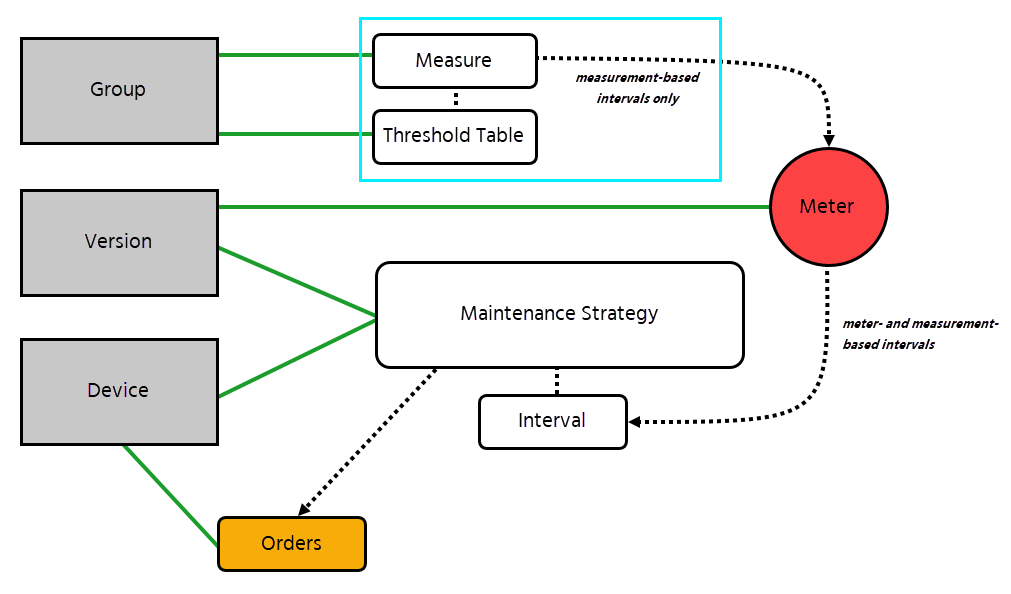
Diagram Showing the Components Used to Generate Orders Through a Maintenance Strategy
If you are creating a time-based interval to generate orders for an asset managed outside of VertiGIS FM Maintenance (for example, a building), add it directly to the Intervals section on the details page for the asset or the object. Maintenance strategies for assets other than devices and components can only have one interval applied, and it must be time-based.
Add Intervals to a Maintenance Strategy for Devices or Components
Once a maintenance strategy has been created, you can add intervals to it. Intervals are added on the maintenance strategy details page.
Add Intervals to a Maintenance Strategy
1.Navigate to the version details or device details page for the maintenance strategy to which you want to apply an interval.
2.In the Maintenance Strategies section, double-click the maintenance strategy you want to apply an interval to, or select it and click the View Details (![]() ) icon.
) icon.
3.Expand the intervals section and click the Add (![]() ) icon.
) icon.
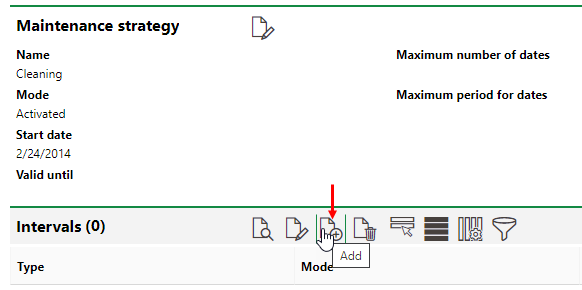
4.From the first Type drop-down menu, select the option that describes the orders that will be generated.
You may not be able to select the desired Interval Type from this drop-down menu because the Type has not been assigned to the version. You can assign Types to versions in the Maintenance Type catalog. To assign the Interval Type to the Version, click Administration in the left pane, and then click Master data > Catalog management > Maintenance > Type of order. Double click the Interval Type, select the version(s) you want to apply it to, and then click Save and Close.
5.From the second Type drop-down menu, select the type of interval you are creating (meter-based, measurement-based, or time-based). Read more about Interval types here.
▪If you select Meter-based, select an operating counter from the Counter drop-down menu. If there are no options to select, you must first add an Operating Counter. Selecting an Operating Counter from the Counter drop-down menu causes a unit of measurement to load next to the Interval text box. The value you enter in the Interval text box is the threshold that based on which the system will generate appointments as you record meter readings.
▪If you select Measurement-based, select a Measure from the Measure drop-down menu, and then select a range from the selected measure's associated threshold table from the Limiting Size Type drop-down menu. You must have already created a Measure and Threshold Table on the device's version details page before creating a measurement-based interval.
▪If you select Time-based, enter a number in the Interval text box, and then select a unit of time from the drop-down menu. Together, these inputs indicate how frequently the maintenance strategy will generate orders.
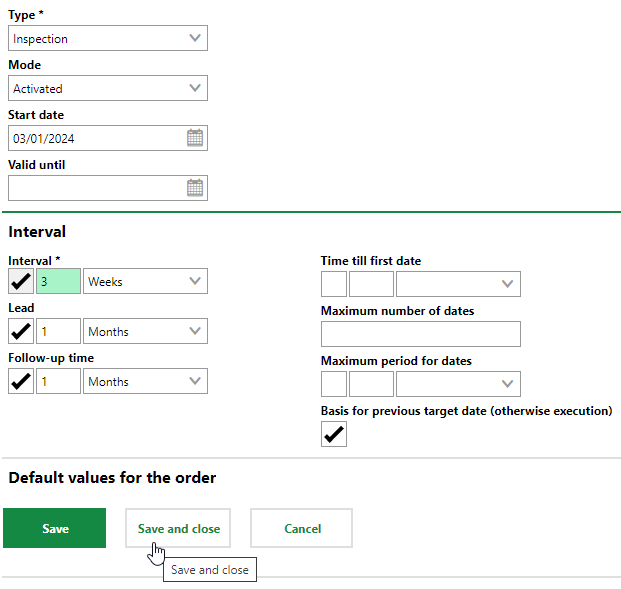
6.Fill in the rest of the form. Refer to the Interval Form Fields for descriptions of the various fields.
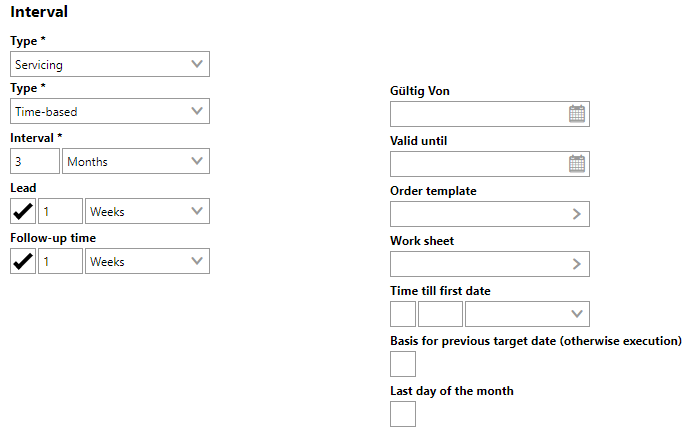
7.Expand the Default values for the order tab and enter additional interval details, as relevant. You can save the interval without completing any of these fields.
8.Click Save and Close.
The Intervals section now shows the new Interval.

Intervals Section
Interval Fields
Refer to Interval Types for examples how maintenance strategy interval properties work in practice.
Interval Fields
Field |
Description |
|||||||||||||||||||||||||
|---|---|---|---|---|---|---|---|---|---|---|---|---|---|---|---|---|---|---|---|---|---|---|---|---|---|---|
Type |
The type of measurement associated with the interval. Selectable options are saved in the Type of Order catalog. |
|||||||||||||||||||||||||
Type |
The type of measurement associated with the interval. Additional fields displays based on the selection from this drop-down menu.
Refer to Interval Types for more information. |
|||||||||||||||||||||||||
Lead |
The amount of time before the scheduled appointment that the measure can take place. |
|||||||||||||||||||||||||
Follow-up Time |
The amount of time after the scheduled appointment that the measure can be carried out until without any issue. |
|||||||||||||||||||||||||
Valid From ("Gultig Von") |
The date the rule is valid from. |
|||||||||||||||||||||||||
Valid Until |
The date the rule is valid until. |
|||||||||||||||||||||||||
Order Template |
The order template for the orders generated by the maintenance strategy. Selectable options are stored in the Order template catalog. The Type, Trade, and Name properties in the order details form populate with the corresponding properties stored in teh order template you select. |
|||||||||||||||||||||||||
Work Sheet |
The work sheet associated with orders generated by the maintenance strategy. In VertiGIS FM Maintenance, the selected work sheet must be assigned to the version for the asset selected in the data object field (e.g., the Device field if the order is for a device). |
|||||||||||||||||||||||||
Time till first date |
The amount of time until the first appointment. If this field is left blank, the system defaults to today's date as the first planned date. |
|||||||||||||||||||||||||
Basis for previous target date |
A check box that, if selected, means that the Planned Date of subsequent orders generated by the interval will remain separated by the amount of time specified in the interval (for example, annually, monthly, or weekly), regardless of the previous order's completion date. For example, if an interval dictates that orders should occur Annually, •if the Basis for previous target date (otherwise execution) check box is selected, and the most recent order has a Planned Date of April 1, 2025, but is completed on April 5, 2025, the next order generated by the interval will have a Planned Date of April 1, 2026. •if the Basis for previous target date (otherwise execution) check box is not selected, and the most recent order has a Planned Date of April 1, 2025, but is completed on April 5, 2025, the next order generated by the interval will have a Planned Date of April 5, 2026. |
|||||||||||||||||||||||||
Last day of the month |
A flag that, when set, generates the planned date of an action for the last day of the month. This feature ensures a measure occurs monthly despite the varying number of days in each month. |
Create a Maintenance Strategy with a Time-Based Interval for a Non-Maintenance Asset
You can add maintenance strategies with time-based intervals to assets managed outside of VertiGIS FM Maintenance (i.e., assets other than devices and components). You cannot create maintenance strategies or use meter- or measurement-based intervals for assets managed outside of VertiGIS FM Maintenance.
To Create a Maintenance Strategy with a Time-Based Interval for a Non-Maintenance Asset
1.Expand the Intervals section on the asset's details page.
2.Click the Add (![]() ) icon.
) icon.
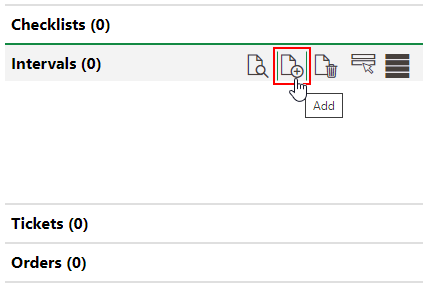
3.In the Maintenance Strategy section, enter the maintenance strategy details.
4.In the Interval section, enter the interval details.
Because you can only add a time-based interval when creating an asset for a non-maintenance asset, the Type menu is not available.
5.Click Save and Close.
Edit an Interval
You can edit an interval by selecting the interval in the Intervals section of the Maintenance Strategy details page and clicking the Edit (![]() ) icon.
) icon.
Changes to an interval do not affect overdue appointments.