A defect or defect indication is a documented issue that can be logged against many data objects throughout all VertiGIS FM products. They are not to be confused with a service desk ticket. Defects are usually fixed internally, whereas service desk tickets often require external services to resolve.
Typically, a defect is logged against a physical object like a device, component, or building object (like a building, floor, or room), and a defect indication is logged against an administrative object like a contract or rental agreement.
Defects
In VertiGIS FM Maintenance, a defect is a problem that is typically logged against a data object like a device in the Device and Systems Structure or a component object in the Component Structure. Defects can also be associated with items like orders. Defects are shown in the Defects section on the device details, object details page, or order details page.
You can also create a defect without any association to an object and assign it to one later.

Defects Section on the Device Details Page
Field |
Description |
|---|---|
Type |
A category assigned to the defect. Selectable options are stored in the Type (defects) catalog. |
Object |
The data object associated with the object. If you are creating a new defect on the details page for an object, the object will be selected in this field by default. |
Recorded on |
The date and time the defect was logged. The current date and time at which you create the defect is selected by default. |
Recorded by |
The party who recorded the defect. Selectable options are stored in the Contact Management module. |
State |
The current state of the defect. |
Priority |
The priority level for fixing the defect. Selectable options are stored in the Priority catalog. |
Planned date |
The date on which work to fix the defect is scheduled to occur or begin. |
Planned time |
The number of hours of work that the defect is expected to require to fix. |
Description |
A general description of the defect. |
Documents |
A field in which you can upload any documents relevant to the defect. |
Add a Defect
You can log a new defect on the details page for the object against which you are logging it. (for example, device details page, order details page, or service desk details page).
Alternatively, you can create a new defect independent of any data object on the search page and assign it an object to it later.
To Add a Defect on the Details Page
1.Navigate to the details page associated with the object against which are logging the defect.
2.Expand the Defects section and click the Add (![]() ) icon.
) icon.
3.Enter the mandatory defect details:
▪Type
▪Recorded on
▪Recorded by
▪State
▪Priority
The Recorded On and Recorded By fields populate automatically based on the date and time the defect is being recorded and the user recording it.
Refer to Defect Details for descriptions of all defect form fields.
4.Optionally, enter the additional defect details.
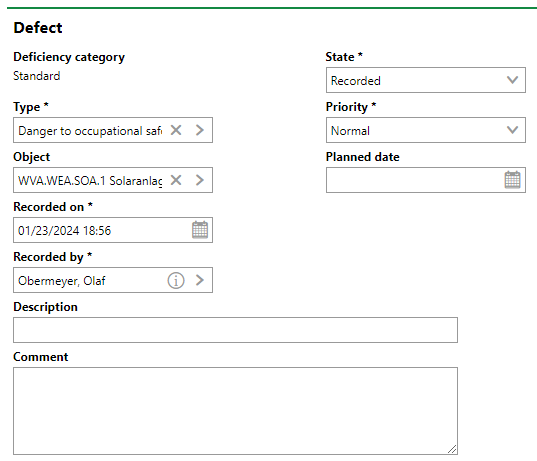
5.Click Save and Close.
You can see the new defect in the Defects section on the details page on which you added it (e.g., the device details page, component details page, or order details page).

New Defect Logged in the Defects Section
The number shown in the Number column is automatically assigned to a defect when you add it.
To Add a Defect on the Search Page
1.Navigate to the search page for the VertiGIS FM product in which the object associated with the defect is managed.
2.Under Objects, click Defect.
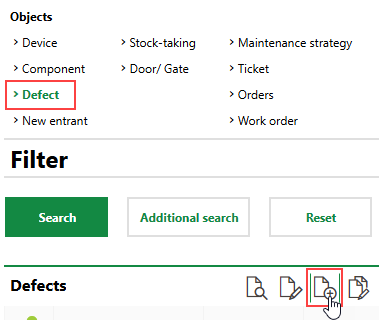
You may need to edit the section authorization on the search page if you do not see Defects listed under Objects.
3.In the Defect form, enter the mandatory details:
▪Type
▪Recorded on
▪Recorded by
▪State
▪Priority
The Recorded On and Recorded By fields auto-populate with the current date and time and your VertiGIS FM user name.
Refer to Defect Details for descriptions of all form fields.
4.Enter any additional details as required.
5.Click Save and Close.
After you save the new defect, it will be listed in the search grid when Defects is selected under Objects. When you are ready to assign an object to it, double-click it. On the details page for the defect, click the Edit (![]() ) icon.
) icon.
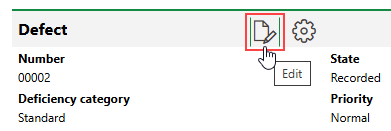
Edit a Defect
You can assign a data object to the defect in the Object field and then click Save and Close. The defect will then appear on the details page for the object to which you assigned it.
Mark a Defect as Fixed
When a defect affecting an object is fixed, you can change its status to Completed by editing it.
To Log a Defect as Fixed
1.In the Defects section, select the defect that has been fixed and click the Edit (![]() ) icon.
) icon.
2.From the State drop-down menu, select Completed.
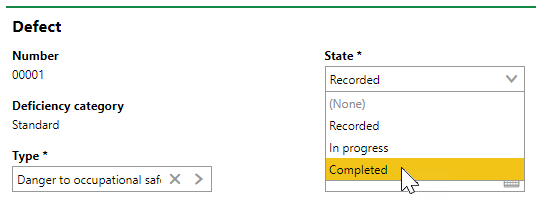
3.Click Save and Close.
Batch Edit Defects
You can edit multiple defects at the same time by using the batch editing feature. To do this, select the defects you want to edit and click the Batch Editing (![]() ) icon. If you don't select any defect and then click the Batch Editing (
) icon. If you don't select any defect and then click the Batch Editing (![]() ) icon, the edits will be applied to all defects logged against the device or component.
) icon, the edits will be applied to all defects logged against the device or component.
In the example below, the status of two defects are simultaneously being changed to Completed. The defects whose status are being changed are shown in the Adopted Elements section.
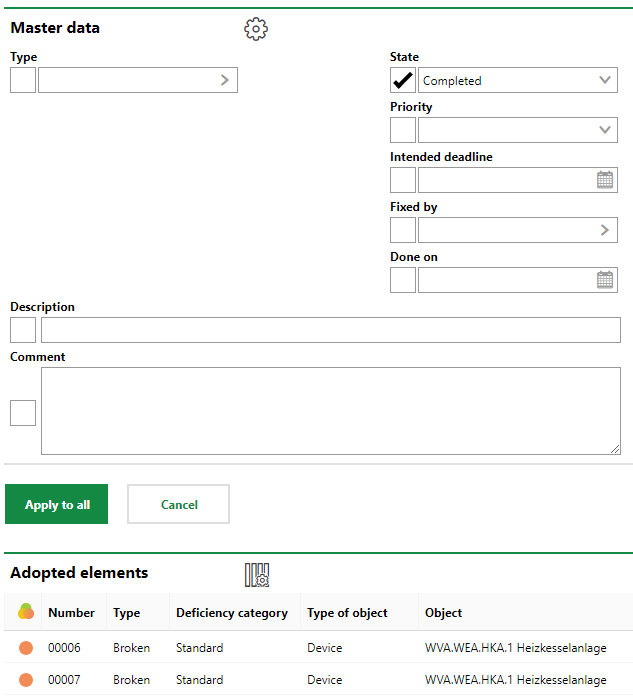
Batch Editing Form for Defects
When you click Apply to All and then OK, the status of both defects update.

Two Defects Batch Edited
Defect Indications
A defect indication is similar to a defect but typically does not refer to a physical defect against an object like a device or a building. For example, in VertiGIS FM Contracts, you may open a defect indication for a rental agreement if a tenant has caused damage to the rental unit associated with it.
You can see the defect indications associated with a data object in the Defect Indications section on its details page (for example, on the rental agreement details page or lease contract details page.). Users associated with contacts selected in the Assigned to or Indicated By fields can also see it on the dashboard, if the dashboard configured to show the Defect Indications section.
Field |
Description |
|---|---|
Type |
A category assigned to the defect indication. Selectable options are stored in the Type (notice of defect) catalog. |
Indicated on |
The date and time the defect indication was logged. The current date and time at which you create the defect is selected by default. |
Indicated by |
The party who recorded the defect indication. Selectable options are stored in the Contact Management module. |
Assigned to |
The party to whom the defect indication is assigned for resolution. Selectable options are stored in the Contact Management module. |
State |
The current state of the defect indication |
Deadline |
The date by which the defect indication must be resolved. |
Grace period |
The date on which work to fix the defect is scheduled to occur or begin. |
Completed on |
The date the defect indication was resolved. |
Content |
A description of the issue. |
Description |
Additional details about the issue. |
Add a Defect Indication
You can add a defect indication on the details page of the data object associated with it (for example, on the rental agreement details page or lease contract details page.).
Unlike with defects, you cannot create a defect indication on the search page and assign it to a data object later.
To Add a Defect Indication
1.Navigate to the details page associated with the object against which are logging the defect indication.
2.Expand the Defect Indications section and click the Add (![]() ) icon.
) icon.
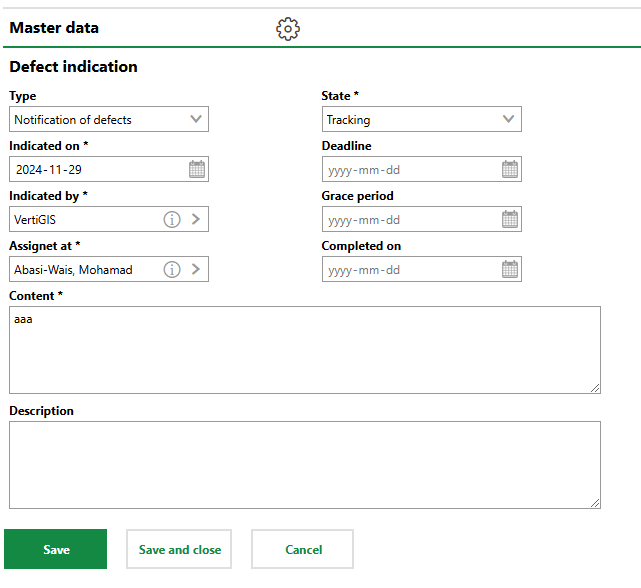
3.Enter the mandatory defect details:
▪Type
▪Indicated On
▪Indicated By
▪Assigned To
▪State
▪Content
The Indicated On and Indicated By fields populate automatically based on the date and time the defect indication is being recorded and the user recording it.
Refer to Defect Indication Details for descriptions of all defect form fields.
4.Optionally, enter the additional defect indication details.
5.Click Save and Close.
The defect indication is now listed in the Defect Indications section on the object's details page.

Defect Indications Section
Answers
In the Answers section, users can save messages describing actions that have been taken to resolve the defect indication.
To add an answer, click the Add (![]() ) icon in the Answers section on the details page for the defect indication.
) icon in the Answers section on the details page for the defect indication.
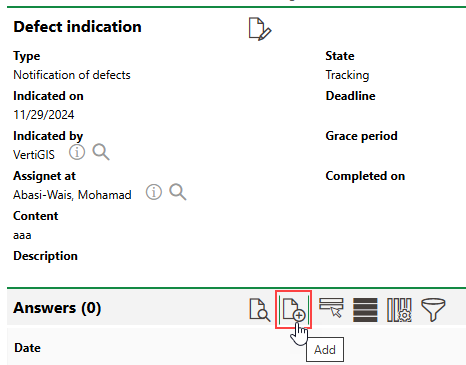
Add an Answer to a Defect Indication
When posting an answer, you can select a quick response stored in the Quick Responses (Defect Indication) catalog.
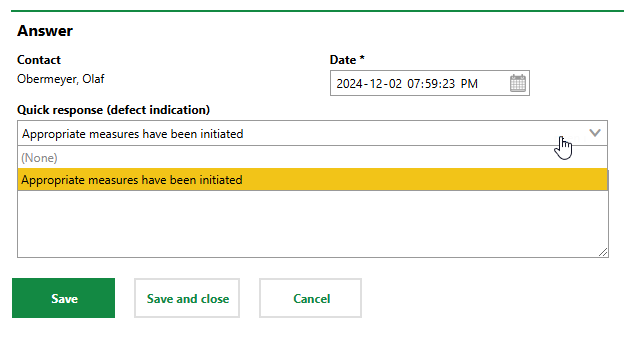
Quick Response Selection
The Answer text box is populated with the quick response you select.

Quick Response and Answer
Alternatively, you can omit a quick response and manually type an update in the Answer field.
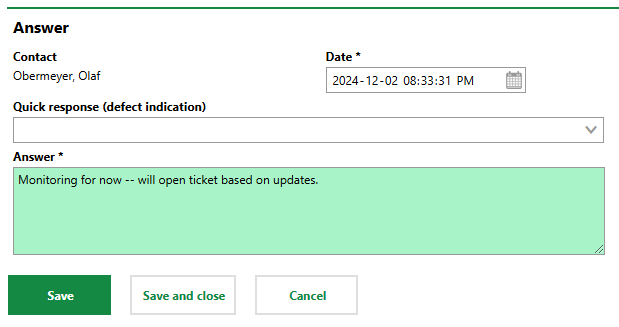
Manual Response
Click Save and Close when you have completed a response.
Unlike with service desk tickets, saving an answer for a defect indication does not automatically update the defect indication's status. You can only change it manually.
You can edit an existing answer by double-clicking it in the Answers section and then clicking the Edit (![]() ) icon.
) icon.
Mark Defect Indication as Complete
You can update a defect indication's status when you edit it.
To Mark a Defect Indication as Complete
1.Navigate to the details page for the data object associated with the defect indication (for example, the standard contract or rental agreement details page).
2.Expand the Defect Indications section and double-click the defect indication whose status you want to edit.
3.Click the Edit (![]() ) icon.
) icon.
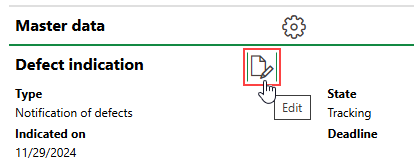
4.Click in the Completed On menu and select the date the defect indication was resolved.
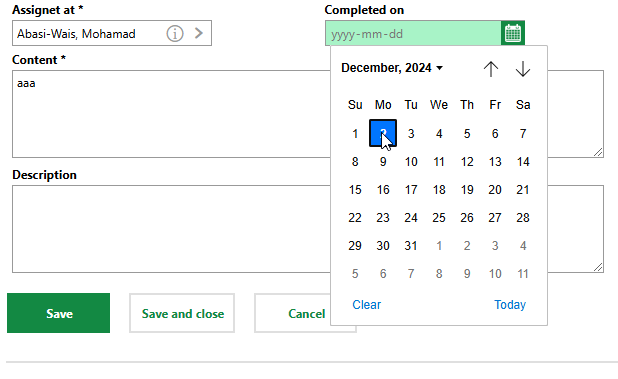
5.Click Save and Close.
The defect indication's state is updated to Finished.
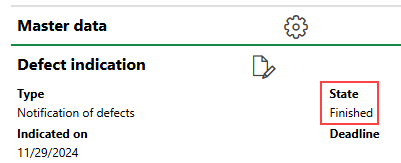
Finished Defect Indication
When complete, the defect indication is also represented by the  icon on the associated object's details page and on the dashboard.

Finished Defect Indication Symbol