Setup for data synchronization is required to enable the transfer of data between your VertiGIS FM database and the GIS database that supports your map. This means that data associated with VertiGIS FM objects like devices, orders, and service desk tickets can be transferred to the GIS as GIS features. Changes made to a GIS feature (e.g., its coordinates) are reflected in VertiGIS FM, and changes made to objects or assets mapped to a GIS feature in VertiGIS FM are reflected in your GIS application.
Data synchronization allows your map users to highlight asset management data in the application. For example, users of your GIS application could see the locations of objects with overdue maintenance tasks on your web map without needing to access VertiGIS FM. You can also indicate how you want VertiGIS FM objects that are not assets, like maintenance orders and service desk tickets, to be shown on your web map. One option is to have them inherit the geometry of their parent asset (e.g., a device order for a wind turbine is shown using the geometry of the wind turbine). Assets are represented using the centerpoint of their geometries.
Data synchronization between VertiGIS FM and your GIS application is set up in the Data Synchronization section on the VertiGIS Studio settings page (Administration > Settings > VertiGIS Studio).
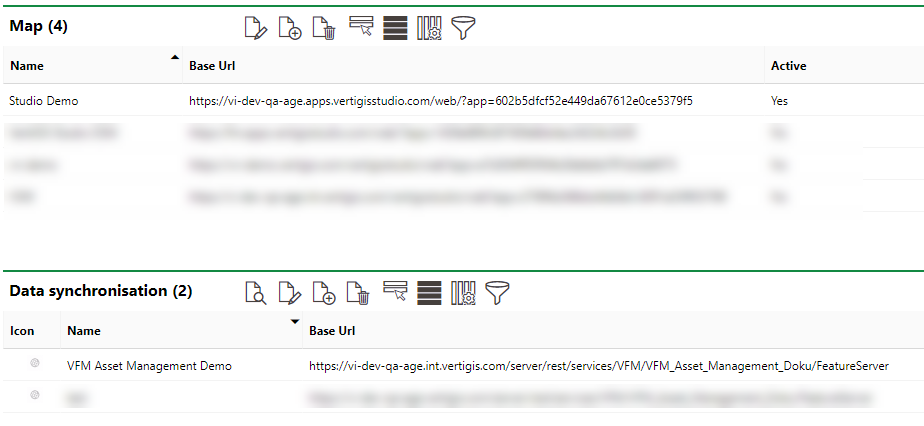
Data Synchronization Section on the VertiGIS Studio Administration Page
Data Synchronization Setup
Synchronize your GIS database with VertiGIS FM by completing the procedures below.
1.Add your feature service. This involves creating a profile for the data synchronization in the Data Synchronization section.
2.Complete the layer mapping for each layer in your web map.
3.Complete the attribute mapping for each layer in your web map. This procedure must be completed at least once, but you can complete it multiple times based on how you want to transfer data between the FM database and the GIS.
The map layers must be linked to an object once in the Map section and again in the Data Synchronization section. In some advanced cases in which a customer uses multiple Map and Data Synchronization profiles, the mappings in the two sections may differ.
Add your Feature Service
First, add your feature service in the Data Synchronisation section on the VertiGIS Studio administration page (Administration > Settings > VertiGIS Studio).
1.Navigate to the VertiGIS Studio administration page (Administration > Settings > VertiGIS Studio).
2.In the Data Synchronisation section, click the Add (![]() ) icon.
) icon.

3.Enter the details for your feature service. This includes the URL for your feature server endpoint and the login credentials for your ArcGIS portal.
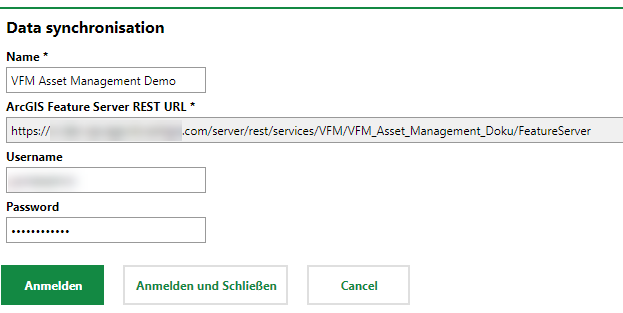
The feature service must be editable and accessible for the user completing the data synchronization.
4.Click Save and Close.
Data Synchronization Details
Field |
Description |
|---|---|
Name |
A name for the data synchronization entry for feature server. |
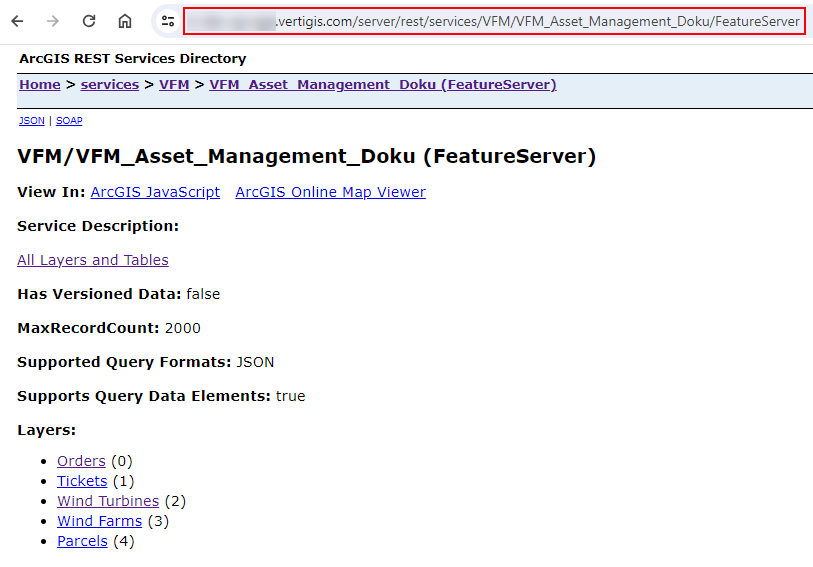
ArcGIS Feature Server REST URL * |
The feature server endpoint. This is the browser URL for the server in the ArcGIS REST Services Directory.
|
Username |
Your user name for your ArcGIS portal. |
Password |
Your password for your ArcGIS portal. |
Associate GIS Features with FM Objects
After you have added the feature server endpoint, you must configure each layer on the web map so that they are associated with the appropriate VertiGIS FM object and data. This involves specifying what you want to happen to a GIS object when you add, edit, or delete an object in VertiGIS FM, and whether you want GIS features to inherit the geometry of their corresponding VertiGIS FM objects.
To Associate a GIS Feature with an FM Object
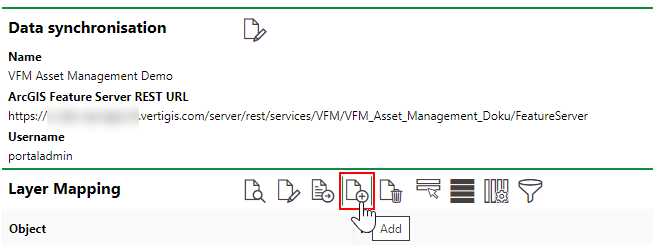
1.In the Data Synchronization section on the VertiGIS Studio administration page (Administration > Settings > VertiGIS Studio), double click the data synchronization entry you created for the feature server.

This page opens immediately after clicking Save and Close when to add your feature server.
2.In the Layer Mapping section, click the Add (![]() ) icon.
) icon.
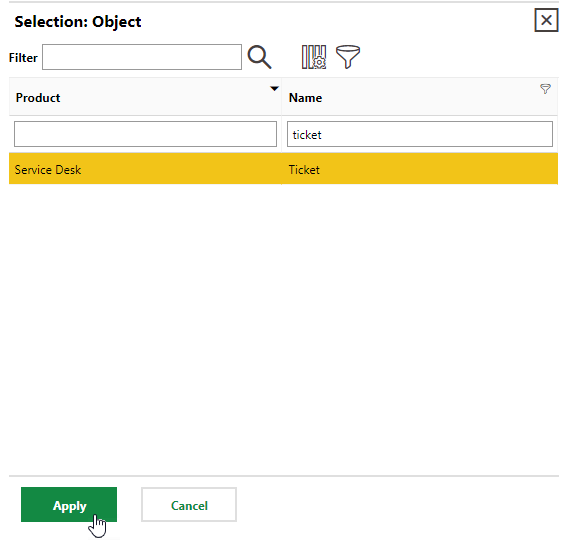
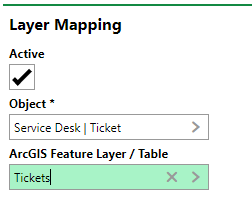
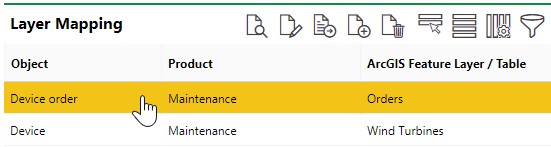
3.Click the > button in the Object menu, select a VertiGIS FM object that you want to associate with one of the layers in the feature server, and click Apply.
4.Click the > button in the ArcGIS Feature Layer / Table menu, select the feature layer you want to associate with the VertiGIS FM object you selected in the previous step, and click Apply.
In most cases, you object-layer pairings should match the pairings you saved in the Map section of the VertiGIS Studio Settings page.
5.Select and specify the action(s) you want to occur when a user makes changes to the VertiGIS FM or GIS database. Refer to Layer Mapping Operations for more information.
6.Click Save and Close.
Repeat the procedure above until you have added all the features in the web map to the Layer Mapping section.
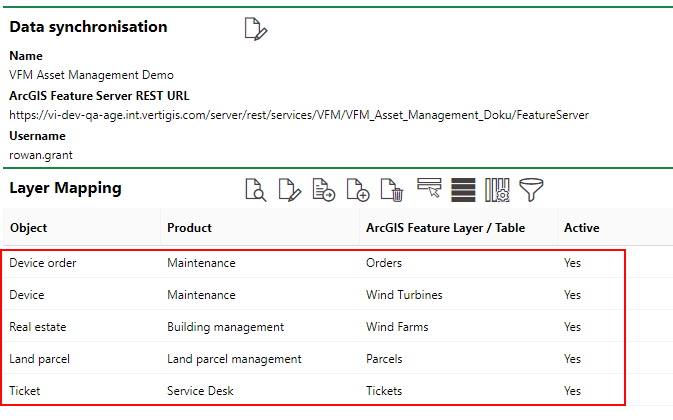
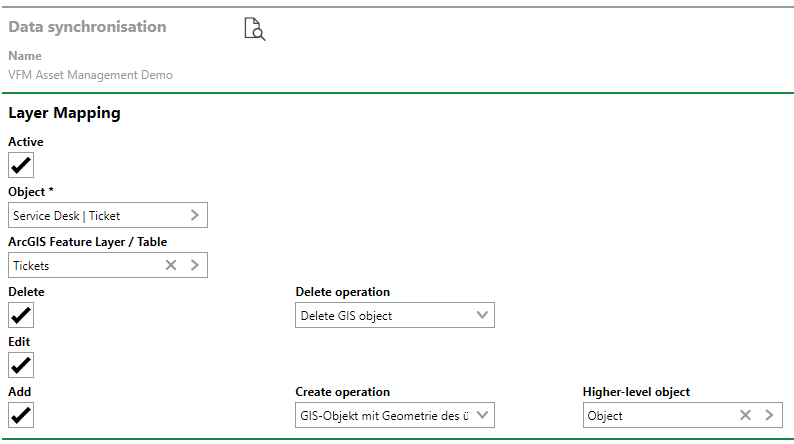
Configured Feature Server Layers
Operation |
Description |
|---|---|
Delete |
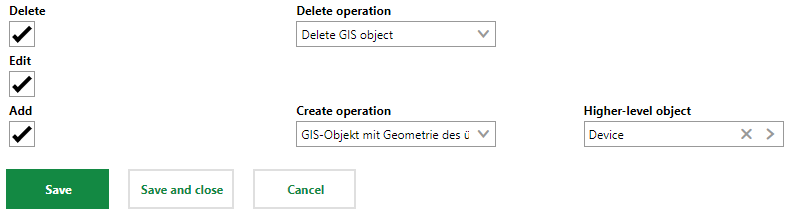
When you select the Delete check box, you can specify whether you want the deletion of the VertiGIS FM object selected in the Object menu to result in the deletion of the corresponding GIS feature in the layer selected in the ArcGIS Feature Layer / Table menu. To specify this, select Delete GIS object in the Delete Operation drop-down menu that appears when you select the Delete check box. If you leave the Delete Operation menu blank, the GIS feature will remain in the GIS database when you delete a corresponding object from the VertiGIS FM database. |
Edit |
Changes made to the VertiGIS FM object selected in the Object menu above are transferred to the GIS feature selected in the ArcGIS Feature Layer / Table menu. |
Add |
When a VertiGIS FM user adds an instance of an object selected in the Object menu above, a corresponding GIS feature selected in the ArcGIS Feature Layer / Table menu is created in the GIS. In the Create Operation check box that appears when the Add check box is selected, you can select Create GIS object without geometry, or Create GIS object with geometry of the parent object if you want the new GIS object to inherit the geometry of the parent object in VertiGIS FM. For example, if you're adding a device order to the Orders layer, you could indicate that you want the feature to inherit the geometry of the feature for its parent device. For an asset like a device, the center point of its polygon will be shown on the map. An object can only inherit the geometry of its parent asset has had its GIS key configured in its object's attribute mapping. |
Currently, the layer mapping operations can only be used for data being imported to the GIS from VertiGIS FM. Operations for data transfers from the GIS to VertiGIS FM will be available in the future.
Map FM Data and GIS Attributes
After you have added the layers in the web map to the Layer Mapping section and mapped them to the appropriate VertiGIS FM object, you can specify which data points in the VertiGIS FM or GIS databases you want to update when corresponding data is updated in the other system. This means configuring how you want changes made to an object in VertiGIS FM to be reflected in the GIS and how you want changes made to a GIS feature by a user of your VertiGIS Studio application to be reflected in VertiGIS FM.
Each layer requires a GIS key. The procedure below outlines how to create one for a layer. After you add a GIS key, you can repeat the procedure below based on how you want data exchanges between the VertiGIS FM database and the GIS to occur. An example is provided at the bottom of this topic.
To Add a GIS Key to a Layer
1.In the Data Synchronisation section on the VertiGIS Studio administration page (Administration > Settings > VertiGIS Studio), double click the data synchronization entry you created for the feature server.
2.Double click one of the layers you've configured in the Layer Mapping section.
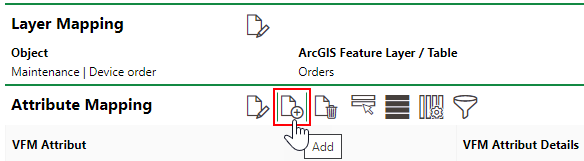
3.In the Attribute Mapping section, click the Add (![]() ) icon.
) icon.
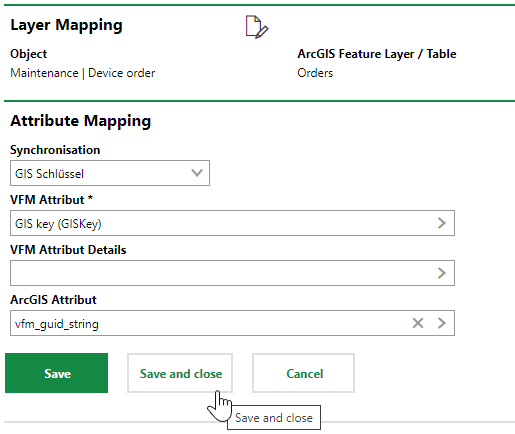
4.From the Synchronisation drop-down menu, select GIS Key.
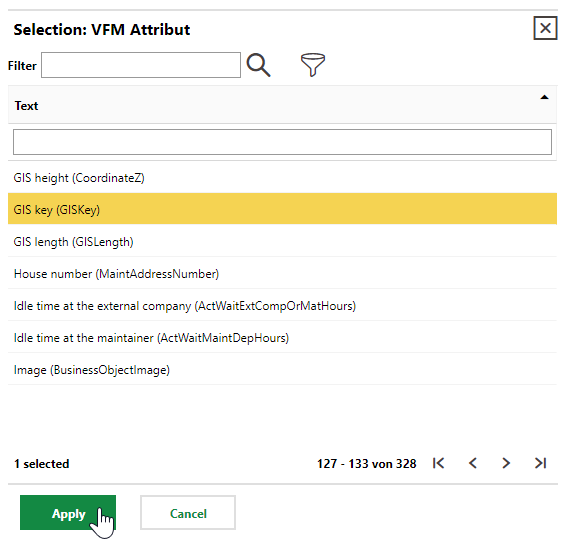
5.Click the > button in the VFM Attribut menu, select GIS key (GISKey), and click Apply.
6.Click the > button in the ArcGIS Attribut menu, select the attribute that contains the GUID that corresponds to the GISKey in VertiGIS FM, and click Apply.
You should have designated the attribute to be the GIS GUID when you set the layer mapping for the web map.
7.Click Save and Close.
After you have added the GIS key for the layer, you can repeat the general procedure above to create additional mappings between a data point for a VertiGIS FM object and an attribute of the corresponding GIS feature.

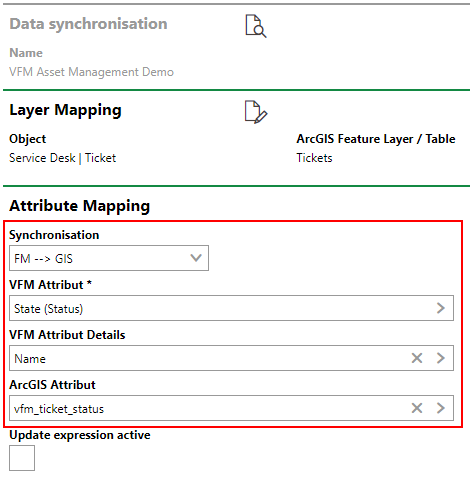
Example of a Completed Attribute Mapping for a Layer. Each layer must have a GIS key configured using the GUID and GIS Key.
Some of the menus used to configure the data transfers between VertiGIS FM and the GIS are outlined below.
Synchronisation
From the Synchronisation drop-down menu,
•select FM --> GIS if you want to transfer data from VertiGIS FM (i.e., changes made to an object by a VertiGIS FM user) to the GIS, or
•select GIS --> FM if you want to transfer data from the GIS (i.e., changes made to a GIS feature by a user of the GIS application) to VertiGIS FM.
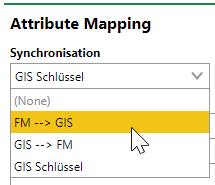
Synchronisation Drop-Down Menu Selections
You can only add attribute mappings with FM --> GIS or GIS --> FM selected after you have added the original attribute mapping with the GIS Key (GIS Schlussel) selected.
Attribute Details
In the VFM Attribute Details menu, you can select the detail associated with the VertiGIS FM data point you selected in the VFM Attribut field. The selectable options are determined by the VertiGIS FM data point you select.
For example, when you select the State (Status) as the attribute to the transferred to the GIS in the layer for service desk tickets, you can specify whether you want to transfer the Name or the Sorting Position of the status.

VFM Attribute Details Options Based on VFM Attribute Selection
Not every VertiGIS FM data point (or attribute) requires you to specify an attribute detail. Some attributes will require it for certain layers or types of objects only.
Example
In the simple example below, when your user creates a service desk ticket in VertiGIS FM, a corresponding ticket is added in the GIS. When the name of a ticket's status is changed in VertiGIS FM, the status of the ticket is reflected in the GIS.
Layer Mapping for Service Desk Feature Layer |
Attribute Mapping for Service Desk Feature Layer |
Data transfers from VertiGIS FM to the GIS occur individually. If you perform a Bulk Edit of multiple objects in VertiGIS FM, the corresponding changes will not immediately appear in the GIS.
Data Synchronization Logs
To verify that you have successfully synchronized the VertiGIS FM and GIS databases, expand the Data Synchronisation Log section on the Data Synchronization page.
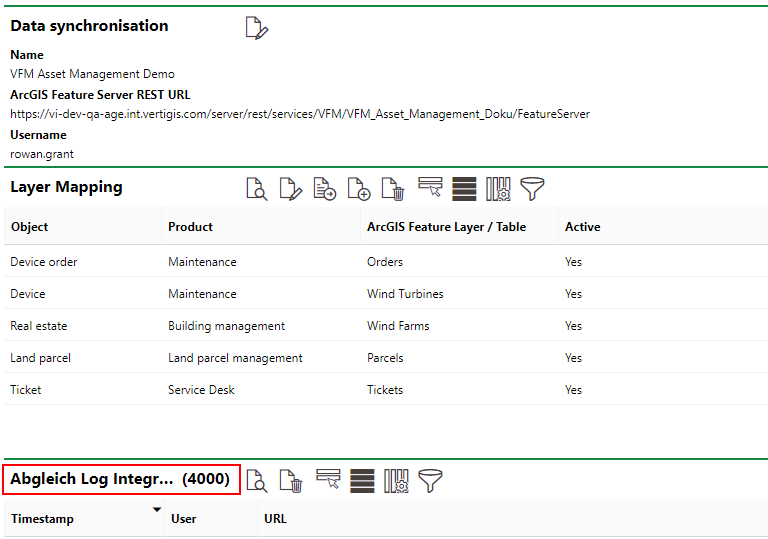
Data Synchronization Log Section
This section reflects the data transfers that have occurred between the databases.
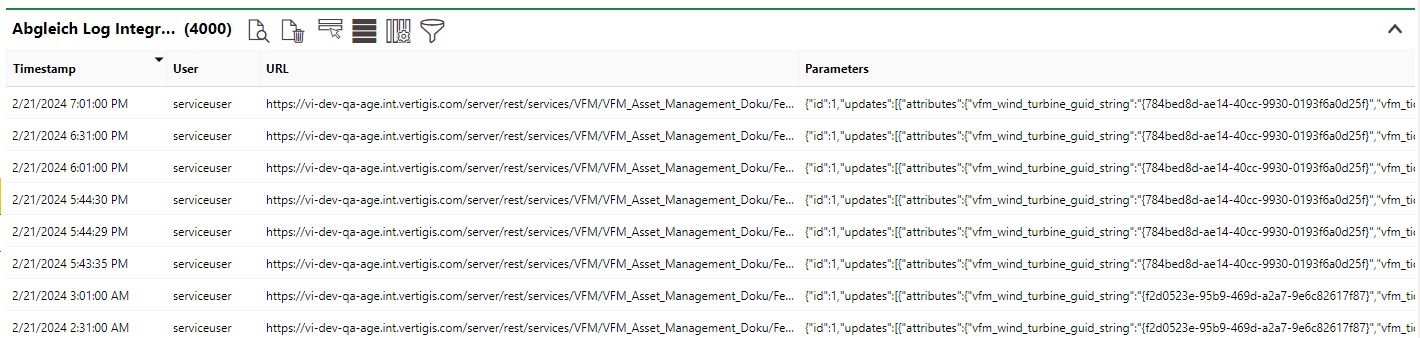
Data Synchronization Logs
You can double-click an entry in the log to review which data VertiGIS FM sent to the GIS and whether the transfer was successful.
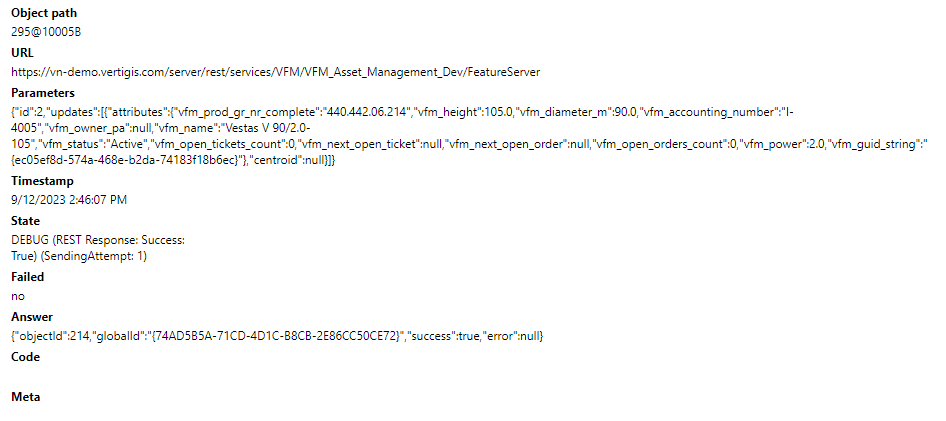
Parameters and Failed Fields for Selected Log Entry
Log Entry Details
Detail |
Description |
|---|---|
Object path |
The data object being updated. |
URL |
|
Parameters |
The data being sent. |
Timestamp |
The date and time the transfer occurred. |
Failed |
Whether the transfer was unsuccessful. |
Answer |
The answer received from the feature server. |