You can set up an external Service Desk form on an intranet page to provide your users an alternative to creating tickets in VertiGIS FM. This form allows users who do not have access to the application to log Service Desk tickets.
Users who open tickets using the external form cannot associate them with most objects in the VertiGIS FM database, like devices and components. Tickets opened with the external Service Desk form can only be associated with rooms if the TicketTypeNames.json file is properly configured.
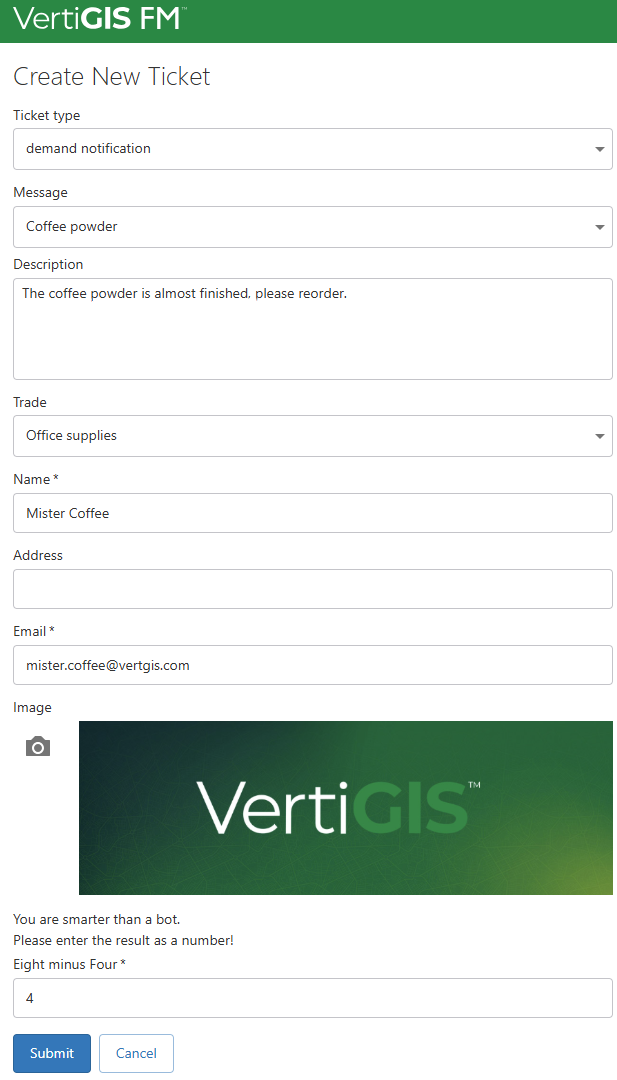
Sample External Form
Setup
Refer to the sections below for information about how to configure various form components. For assistance, contact your system administrator.
AppSettings.json
In the AppSettings.json file in your VertiGIS FM installation directory, specify the VertiGIS FM endpoint (i.e., your application's URL) and enter credentials for the VertiGIS FM user to whom tickets opened using the external service desk form will be attributed.
{
"endpoint": "",
"user": "",
"pwd": ""
}
AppSettings.json Keys
Key |
Value |
Example |
|---|---|---|
endpoint |
The VertiGIS FM environment in which the ticket will be opened. If applicable, include a virtual path and trailing slash. Refer to Certificates. |
https://vi-dev-qa-fm.int.vertigis.com/dev/ |
user |
The VertiGIS FM user under whom the tickets created with the form will be opened.
Reporting Person Field in Service Desk Ticket The user must already exist in the VertiGIS FM environment and be assigned a user role with the minimally required permissions. |
VertiGIS-FM-IssueReporter ExternalServiceDeskReportIssue |
pwd |
The password for the VertiGIS FM user under whom the tickets created with the form will be opened. |
NN2+6Mo/g^;v#-yGn,A/#gpk$?n9TW |

Certificates
If your VertiGIS FM endpoint uses a self-signed or otherwise untrusted certificate, you must export its root certificate using a tool like certmgr.msc in Base64 format and place its contents in the build/cert/servertrusted.cer file. During HTTPS calls, the external service desk form uses this file to trust your environment's endpoint.
TicketTypeNames.json
In the TicketTypeNames.json file in your VertiGIS FM installation directory, configure the external service desk form according to the menus and options you want the form's users to see. You can also provide prefixes that will be included in resulting service desk tickets.
{
"UseMappedIssues": true,
"HideIssueBox": false,
"ReporterNamePrefix": "",
"ReporterAddressPrefix": "",
"HideIssueContextBox": true,
"IssueContextPrefix": "",
"IssueDescriptionPrefix": "",
"TicketTypeNameMappedIssues": [
{
"TicketTypeName": "Service Request",
"Issues": [
"First selectable option for Service Request",
"Second selectable option for Service Request",
"Third selectable option for Service Request"
]
},
{
"TicketTypeName": "Damage",
"Issues": [
"First selectable option for Damage",
"Second selectable option for Damage",
"Third selectable option for Damage"
]
}
],
"TradeNames": [
"Building supervisor",
"Electrician"
]
}
TicketTypeNames.json Keys
Key |
Description |
||||
|---|---|---|---|---|---|
UseMappedIssues (Boolean) |
This Boolean data type determines whether a user who submits the form can select an issue from a predefined list of issues in the corresponding ticket type's "Issues" array within the "TicketTypeNameMappedIssues" array in the JSON file.
In the example below, "UseMappedIssues" is set to true, which means the user who submits the form can select any of the options in the "Issues" array when submitting a ticket with Service Request selected in the Ticket Type menu. { |
||||
HideIssueBox (Boolean) |
This Boolean determines whether the form will include a text box in which the user can describe the issue.
This option provides form users with an alternative to the drop-down menu in which they can select a predefined issue. This means that if the UseMappedIssues Boolean is set to true, the HideIssueBox Boolean should also be set to true. "UseMappedIssues": true, |
||||
ReporterNamePrefix |
The text you enter as this value will precede the value the user enters in the Name field in the new service desk ticket's Description field.
Name Field in External Service Desk Form {
ReporterNamePrefix Value in Service Desk Ticket |
||||
ReporterAddressPrefix |
The text you enter as this value will precede the value the user enters in the Address field in the new service desk ticket's Description field.
Name and Address Fields in External Service Desk Form {
ReporterAddressPrefix Value in Service Desk Ticket |
||||
HideIssueContextBox (Boolean) |
This Boolean determines whether the form will include an Issue Context text box, in which the user can enter a room identifier to link the new service desk ticket to a room using the room's CustomString1 property. By default, the CustomString1 property is hidden on the room's details page in VertiGIS FM.
|
||||
IssueContextPrefix |
The text you enter as this value will precede the text the user enters in the Issue Context text box in the form. The system will use the resulting string to query the database and link the ticket to a room with a matching CustomString1 value. { Given the configuration above, if a user enters 12345 in the Issue Context field in the form, the system will search the record of rooms for one whose CustomString1 value is ABC_12345. |
||||
IssueDescriptionPrefix |
The text you enter as this value will precede the value the user enters in the Description field in the new service desk ticket's Description field.
Description Field in External Service Desk Form {
IssueDescriptionPrefix Value in Service Desk Ticket |
||||
TicketTypeNameMappedIssues |
This key's value is an array of objects. Each "TicketTypeName" value in this array is an option the user can select from the Ticket Type menu in the form. {
Ticket Type Menu in External Service Desk Form Each ticket type name defined in the JSON file must exist as an entry in the Type Service Desk catalog. In the JSON file, each option should be entered in the language of the user specified in the AppSettings.json file. If the "UseMappedIssues" Boolean is set to true, you can add the "Issues" key with an array of predefined issues the user can select in the form when the corresponding ticket type is selected in the Ticket Type menu. { |
||||
TradeNames |
This key's value is an array of strings. Each string is an option the user can select from the Trade menu in the external service desk form. { Each trade name defined in the array must exist as an entry in the Trade Platform catalog. |


Deploy Via Docker
When you have configured your external Service Desk form, you can deploy it as an image that captures the form's code, settings, and file structure using Docker. Go here to install Docker on your computer.
When you have installed Docker, deploy your form by executing the following command:
docker build -t [your image name]:[image tag]
In the command, enter
•a name for your form as [your image name].
•a counter as [image tag]
Example
docker build -t IssueReporter:001
Prefill Location
VertiGIS FM automatically assigns locations to Service Desk tickets created using the external form if the following conditions are met:
•The user saved in the AppSettings.json file is linked to an employee in the VertiGIS FM database.
•The employee is assigned to a room in the VertiGIS FM database.
•The Service Desk setting Populate Location is set for the user's role. Refer below for instructions.
The building in which the room is located is used as the location for the ticket.

Building Location Assigned To Service Desk Ticket
To have different locations used for tickets created using the external form, you must create a separate external form for each user.
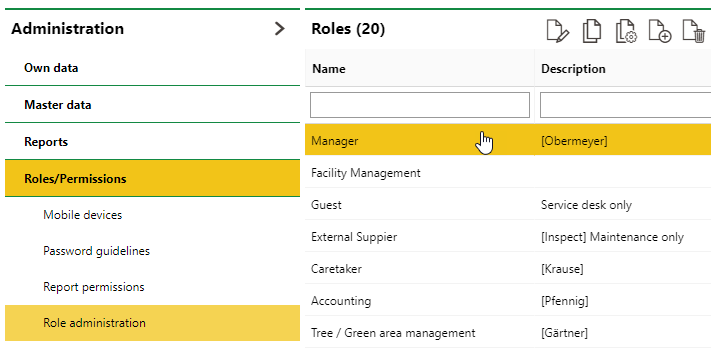
To Set the Populate Location Setting for a User
1.Navigate to the role administration page (Administration > Roles/Permissions > Role Administration).
2.Under Roles, double-click the user role whose Populate Location setting you want to set.
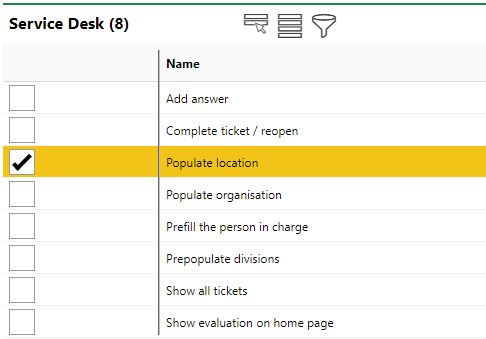
3.Expand the Service Desk section.
4.Select the Populate Location setting.
5.Click Save and Close.