System Requirements
•Minimum OS: Windows Server 2022
•Docker: Docker Engine (Docker Engine - Community is fine)
Prerequisites
You will need your ACR Username and ACR Password - ask VertiGIS Support Team.
Create the Data Directory
Create the following directory:
C:\app\dxfexport\dxf-data
If you choose a different directory, you must adjust it in all subsequent commands.
Install Docker Engine
The server will restart automatically after installation.
Download and Run the Docker Engine Install Script
Open PowerShell as Administrator and run:
cd C:\app\dxfexport
Invoke-WebRequest -UseBasicParsing `
-OutFile install-docker-ce.ps1 `
"https://raw.githubusercontent.com/microsoft/Windows-Containers/Main/helpful_tools/Install-DockerCE/install-docker-ce.ps1"
.\install-docker-ce.ps1
The installation will complete automatically after restarting (a PowerShell window will appear).
Verify the Installation
After the server restarts, open PowerShell as Administrator again and run:
cd C:\app\dxfexport
docker version
Expected result (example):
Client:
Version: 29.3.0
API version: 1.54
Go version: go1.25.7
Git commit: 5927d80
Built: Thu Mar 5 14:28:30 2026
OS/Arch: windows/amd64
Context: default
Server: Docker Engine - Community
Engine:
Version: 29.3.0
API version: 1.54 (minimum version 1.40)
Go version: go1.25.7
Git commit: 83bca512
Built: Thu Mar 5 14:25:24 2026
OS/Arch: windows/amd64
Experimental: false
Download the Deployment Script
cd C:\app\dxfexport
Invoke-WebRequest -UseBasicParsing `
-OutFile dxfexport.ps1 `
"https://github.com/vertigis/vertigis-networks-utils/blob/main/DXF%20Deployment/dxfexport_windows.ps1"
Run the Deployment Script
.\dxfexport.ps1
The script will prompt you for deployment parameters.
Recommended Inputs
Question |
Recommended Input |
|---|---|
Database backend |
2 (SQLite) |
SQLite container DB path |
press Enter (default) |
Host directory for SQLite |
C:\app\dxfexport\dxf-data |
Image name |
press Enter (default) |
API Port 1 |
press Enter (default: 5000) |
API Port 2 |
press Enter (default: 5001) |
ACR Username |
Enter your username |
ACR Password |
Enter your password |
Example Execution
PS C:\app\dxfexport> .\dxfexport.ps1
2026-03-11 09:16:53
=== DXF Export Deployment v2.4 ===
2026-03-11 09:16:53 [WARN] Configuration file not found: dxf-deployment.conf
Select database backend:
1) PostgreSQL
2) SQLite
Enter choice [1-2]: 2
2026-03-11 09:16:55 [i] Database backend selected: sqlite
2026-03-11 09:16:55 [i] SQLite backend - no database server credentials required.
Enter SQLite .db file path inside container (default: C:\app\SQLite\export.db):
Enter host directory to persist SQLite file (default: ./dxf-data): C:\app\dxfexport\dxf-data
Enter Image Name (default: networks/dxf-export-windows:1.4.0):
Enter host port for API 1 (default: 5000):
Enter host port for API 2 (default: 5001):
2026-03-11 09:17:01 [i] Configuration Summary:
2026-03-11 09:17:01 [i] Mode: new
2026-03-11 09:17:01 [i] DB Type: sqlite
2026-03-11 09:17:01 [i] SQLite host dir: C:\app\dxfexport\dxf-data
2026-03-11 09:17:01 [i] SQLite container: C:\app\SQLite\export.db
2026-03-11 09:17:01 [i] Image: networks/dxf-export-windows:1.4.0
2026-03-11 09:17:01 [i] Ports: 5000, 5001
2026-03-11 09:17:01 [i] Deploy from Docker Hub: False
Continue with deployment? (y/N): y
The DXF Export Service is now running.
Test the Service
Open in a browser on the server: http://localhost:5000/swagger/index.html
Import Root CA Certificate (Only if Required)
This is required only if your ArcGIS Server uses a non-public CA (e.g., VertiGIS CA).
Export the Root CA
On the ArcGIS Server machine:
1.Press Win + R and run certlm.msc
2.Navigate to Trusted Root Certification Authorities > Certificates
3.Locate the issuing CA
4.Right-click > All Tasks > Export
5.Export as RootCA.cer
6.Copy it to C:\app\dxfexport
Create Certificate Directory Inside the Container
docker exec -it dxf-export-service powershell
# Inside the container:
New-Item -ItemType Directory -Path C:\certs
exit
Copy the Certificate into the Container
docker cp C:\app\dxfexport\RootCA.cer dxf-export-service:C:\certs\
Import the Certificate
docker exec -it dxf-export-service powershell
Then:
Import-Certificate -FilePath "C:\certs\RootCA.cer" -CertStoreLocation Cert:\LocalMachine\Root
The service can now trust SSL/TLS connections to ArcGIS Server.
Modify an Existing Deployment
To update parameters (ports, directories, etc.):
.\dxfexport.ps1 -update
Semi-Manual Process (Fallback)
Use this if the script cannot download the Docker image automatically.
Export Image from an Existing Deployment
cd C:\app\dxfexport
docker save -o dxf-export-windows_1.4.0.tar vertigisapps.azurecr.io/networks/dxf-export-windows:1.4.0
Copy Image to the Target Machine
Place the .tar file in:
C:\app\dxfexport
Load Image into Docker
cd C:\app\dxfexport
docker load -i dxf-export-windows_1.4.0.tar
Download the Minimal Deployment Script
cd C:\app\dxfexport
Invoke-WebRequest -UseBasicParsing `
-OutFile dxfexport_min.ps1 `
"https://github.com/vertigis/vertigis-networks-utils/blob/main/DXF%20Deployment/dxfexport_min_windows.ps1"
Run the Minimal Script
.\dxfexport_min.ps1
Recommended Inputs
Prompt |
Input |
|---|---|
.env file path |
Enter (default) |
SQLite file path |
Enter (default) |
SQLite host path |
Enter (default) |
External Port 1 |
Enter (default) |
External Port 2 |
Enter (default) |
Docker Image |
Enter (default) |
Example Output
PS C:\app\dxfexport> .\dxfexport_min.ps1
.env file path [.env]:
SQLite file path [C:\app\SQLite\export.db]:
SQLite host path [C:\app\dxfexport\dxf-data]:
External Port 1 [5000]:
External Port 2 [5001]:
Docker Image [vertigisapps.azurecr.io/networks/dxf-export-windows:1.4.0]:
11f201da3df099597e804da060ff7d6abc30e0f46282ebb9f60a07c699888000
Configure Reverse Proxy (IIS)
This allows HTTPS access and avoids exposing port 5000. Configure this on the Vertigis Studio server (or equivalent host).
Prerequisites
Install the IIS modules required for reverse-proxy and URL rewriting before continuing:
On customer systems, this is typically handled by IT via firewall or proxy configuration.
Example target URL:
https://vbe-sup-05.int.vertigis.com/vertigisstudio/web
To add the rewrite rule:
1.Open IIS Manager.
2.At the server level, open Application Request Routing -> Server Proxy Settings, enable Enable proxy, and click Apply.
3.Select the relevant site.
4.Open URL Rewrite.
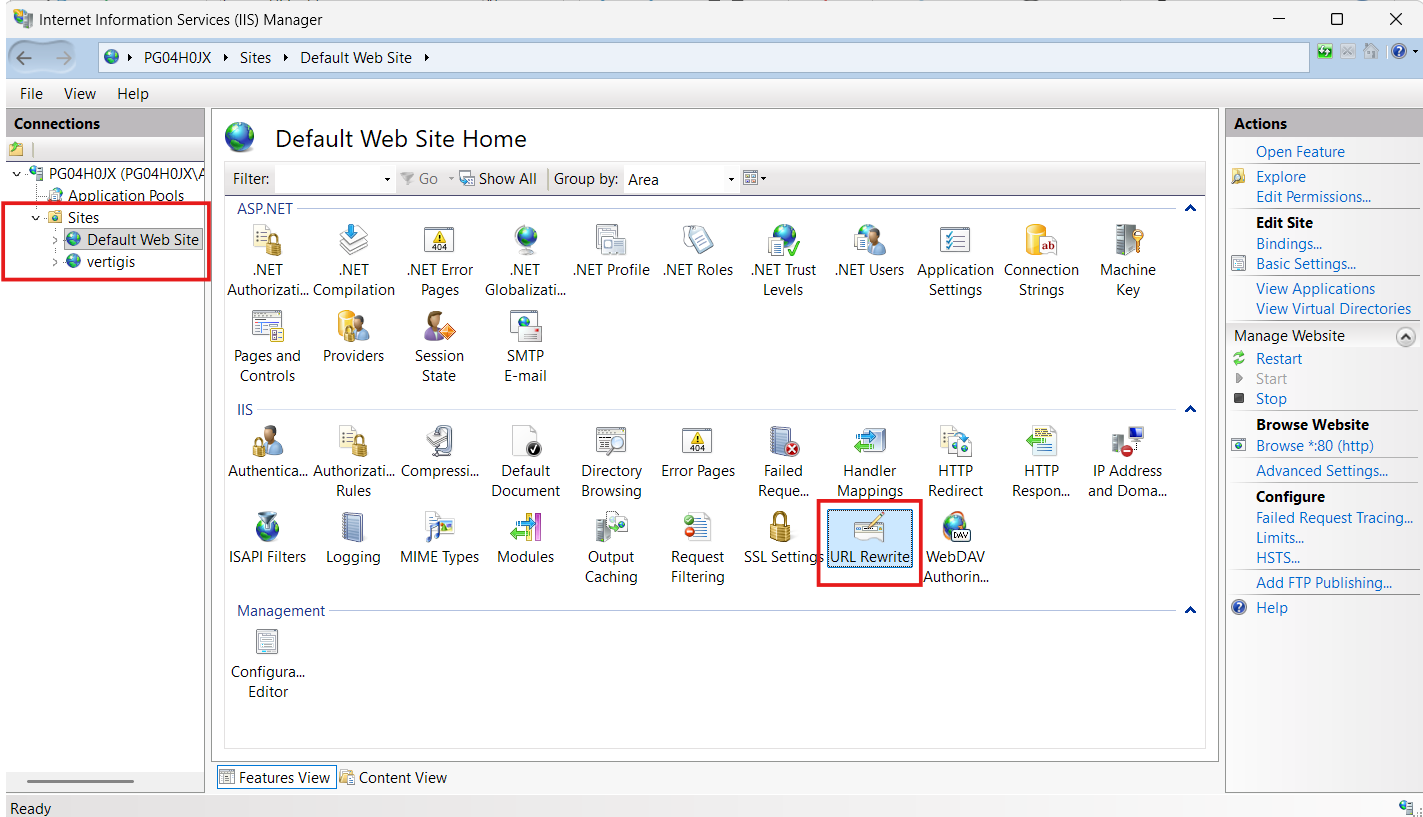
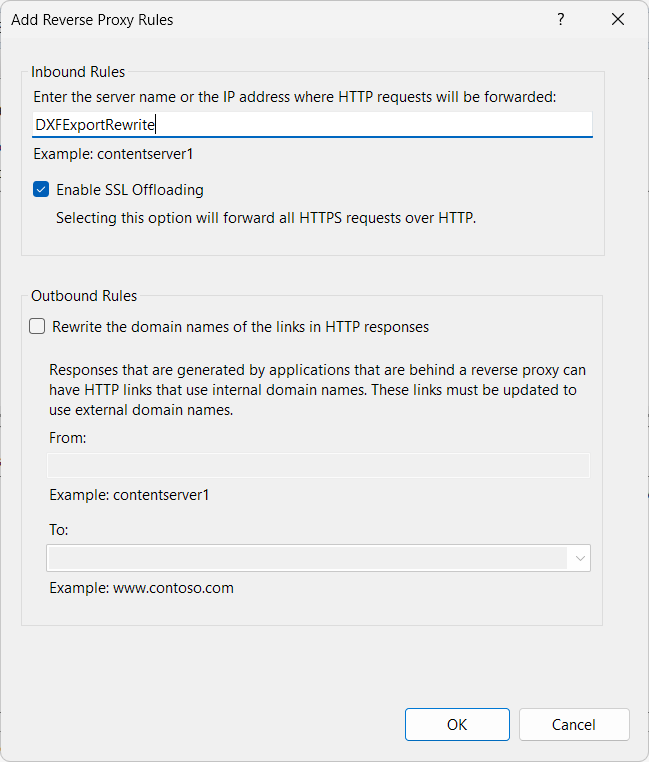
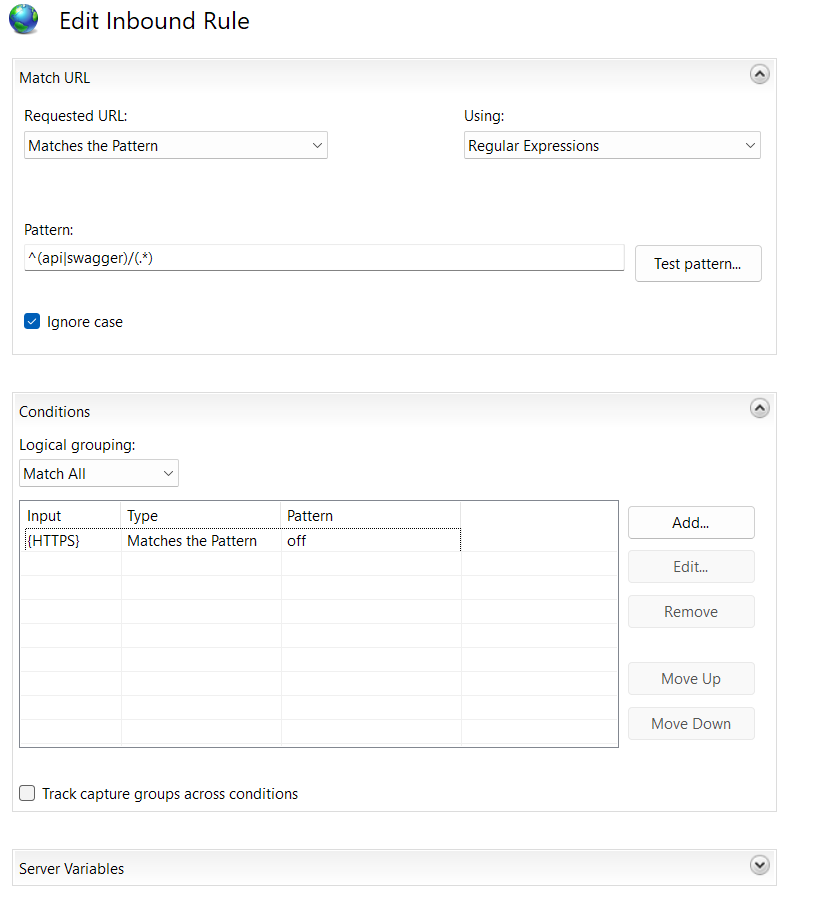
5.Choose Add Rule -> Reverse Proxy, name it DXFExportRewrite: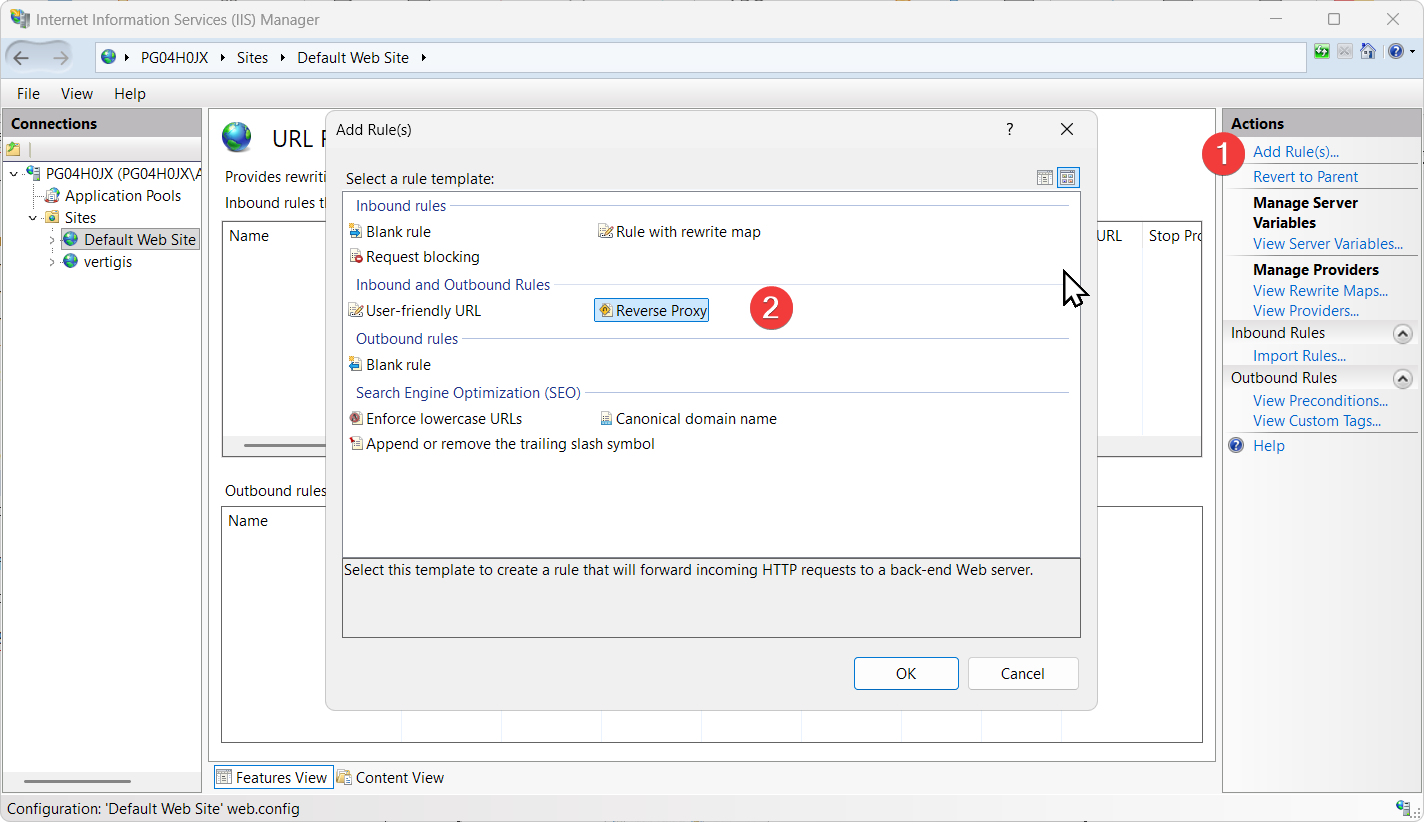
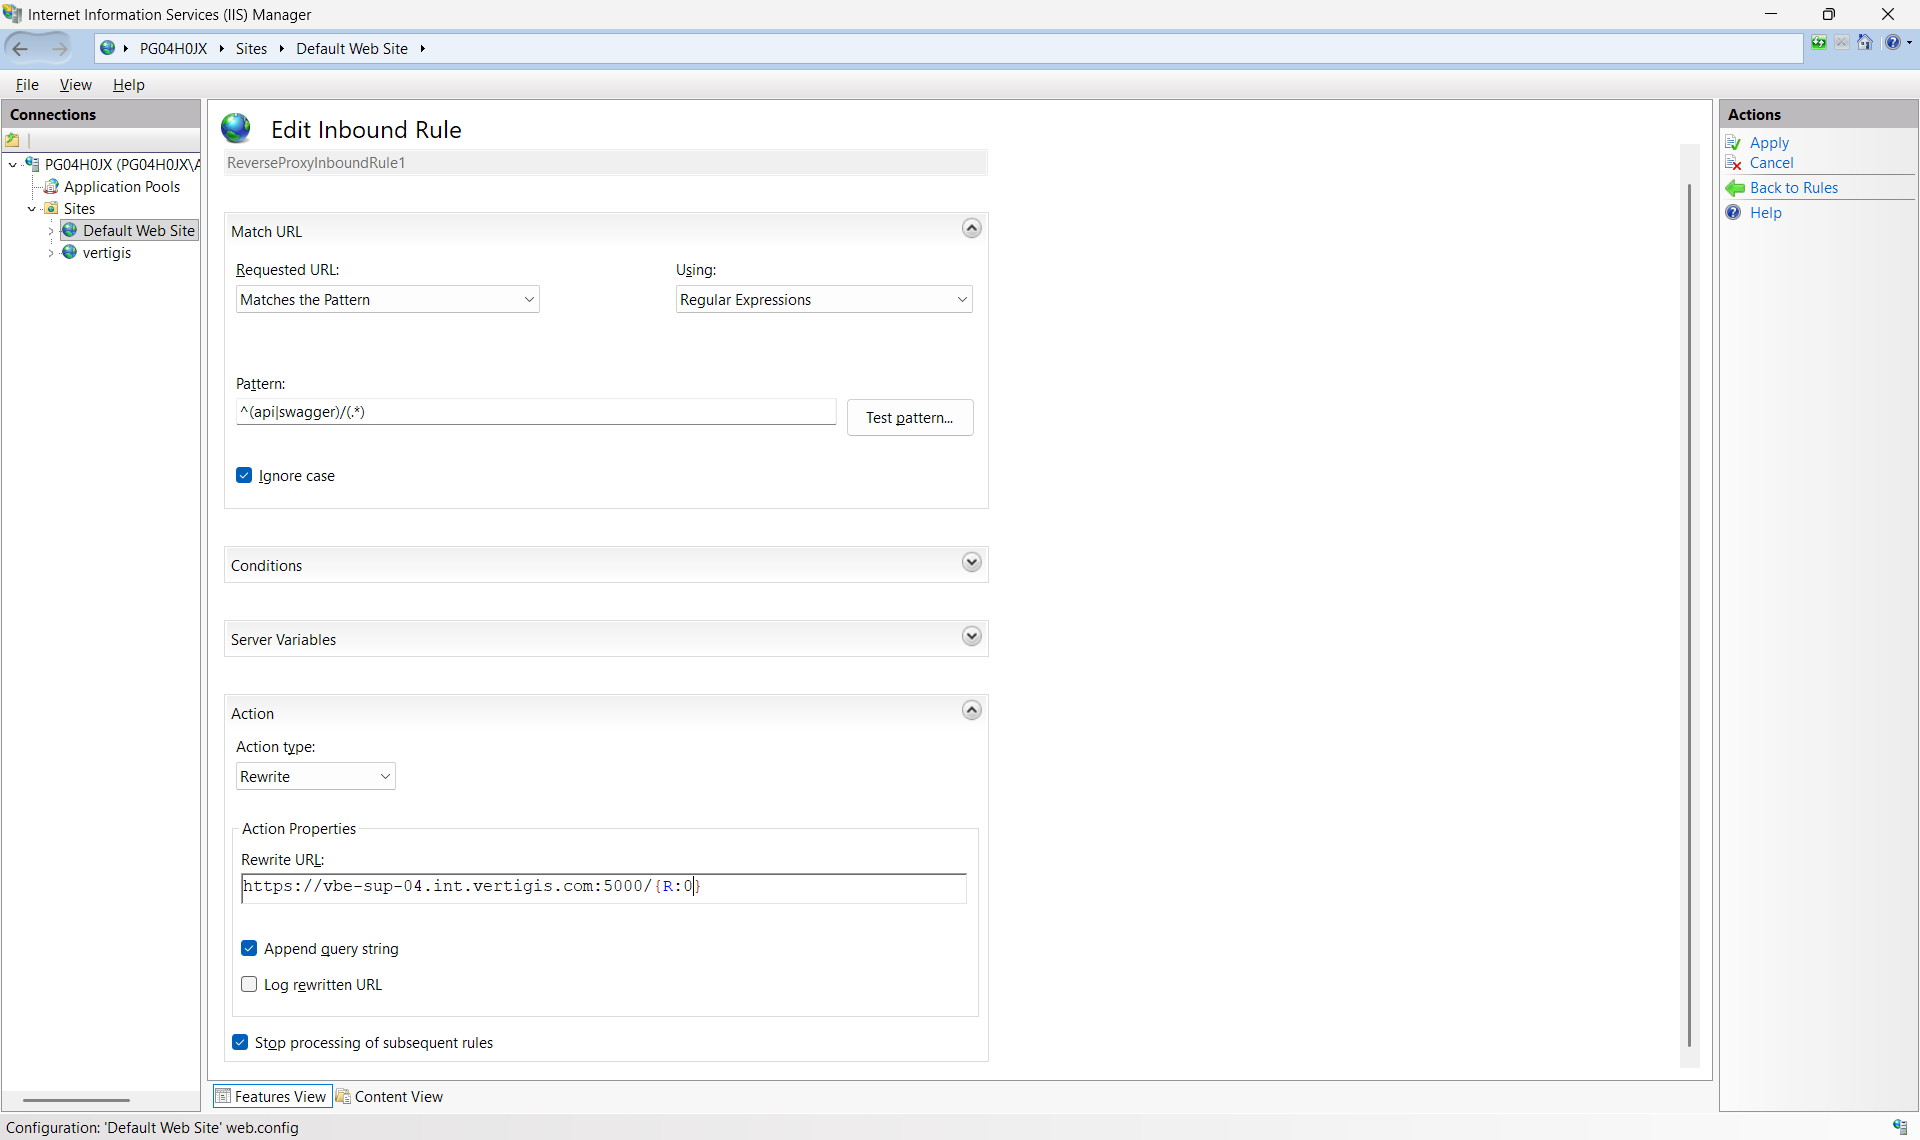
6.Double click on the rewrite rule and configure it as follows:
Field |
Value |
|---|---|
Inbound rule -- Pattern |
^(api|swagger)/(.*) |
Inbound rule -- Rewrite URL |
http://localhost:5000/{R:0} or http://<servername>:5000/{R:0} |
Conditions |
https://{HTTP_HOST}/{R:1} |
Troubleshoot
When something does not work as expected, open your browser's developer tools (F12) and inspect the Network tab for failed requests, then use the commands below to inspect the container.
# Tail service logs
docker logs -f dxf-export-service
# Inspect container status
docker ps -a --filter "name=dxf-export-service"
# Restart the container
docker restart dxf-export-service
If restarting does not resolve the issue, remove the container and redeploy from scratch.