This chapter outlines the configuration changes introduced in version 1.9 and provides step-by-step guide instructions for upgrading from version 1.8.
Helm values
Gateway vs Ingress
Starting with Networks Locator 1.9, support for the Kubernetes Gateway API is available as a modern replacement for traditional Ingress resources. This is especially relevant for setups that previously relied on Ingress NGINX, which has been deprecated and no longer receives security updates. Adopting the Gateway API enables a more future‑proof, extensible approach that aligns with current Kubernetes networking standards.
Networks Locator does not deploy or manage the Gateway itself. The Helm values simply reference an existing Gateway that is provided and operated by the platform or infrastructure team. Networks Locator integrates with this Gateway by attaching its routes via the Kubernetes Gateway API.
Helm Configuration
global:
# Gateway configuration – references an existing Gateway (supported since v1.9)
gateway:
name: <GATEWAY-NAME>
namespace: <GATEWAY-NAMESPACE>
# If you are still using ingresses, set the ingressClassName and
# tlsSecretName accordingly and comment out the gateway configuration above.
#ingressClassName: <INGRESS-CONTROLLER-CLASSNAME>
#tlsSecretName: <TLS-SECRET>
Configuration Options
Gateway API (recommended, available since v1.9)
•Configure global.gateway.name and global.gateway.namespace to reference an existing Gateway resource. Networks Locator will attach its routes to this Gateway but will not create or manage it.
Classic Ingress (legacy)
•For environments that still use Ingress resources, comment out the Gateway configuration and set ingressClassName and tlsSecretName instead. This option is provided for backward compatibility.
For new deployments and long‑term setups, using the Gateway API introduced in version 1.9 is strongly recommended.
DXF-Export
The DXF service has been extracted into a standalone Helm chart, allowing it to be used independently of Networks Locator and in other deployment contexts. As a result, you must add the corresponding configuration values at the root level of your existing values.yaml file.
networks-dxf-export:
registry:
url: vertigisapps.azurecr.io
# if secretName is set, the username and password are ignored
#secretName: <REGISTRY-SECRET-NAME>
username: <USER-NAME>
password: <PASSWORD>
Step by Step Upgrade Instructions
1.Back up your Process Manager, Storage, and Sync Service settings by saving the JSON config from the Admin Client to a local file—just in case.
2.Make sure you have a valid connection to your kubernetes cluster
3.There are two ways to deploy the solution packages that contain the web client. You can either deploy them manually or use the automated approach during the Helm deployment
a.via Helm: add this to your values.yaml directly under the global property:
solutionDeployment:
portalUrl: "{{ tpl .Values.global.arcgis.enterpriseUrl . }}/portal"
portalUsername: <PORTAL-USERNAME>
portalPassword: <PORTAL-PASSWORD>
webViewerUrl: <STUDIO-WEB-VIEWER-URL>
workflowDesignerUrl: <STUDIO-WORKFLOW-DESIGNER-URL>
webMapUrl: <WEBMAP-URL>
webViewerAccountId: <STUDIO-WEB-VIEWER-ACCOUNTID>
# https://<KUBERNETES-HOST>/api-network-locator-gateway
locatorUrl: <LOCATOR-URL>
# https://<KUBERNETES-HOST>/api-network-locator-gateway/history/FeatureServer/1
featureLayerUrl: <FEATURE-LAYER-URL>
When upgrading an existing Solution Package from 1.8 to 1.9 using helm upgrade, a one‑time manual step is required. Before running the upgrade, add the deploymentId of the currently deployed Solution Package to the network-locator-solution-deployment-configmap. The screenshot below shows an example where the deploymentId is highlighted in the ConfigMap. Ensure this value matches the deploymentId of your existing deployment. In future upgrades this will not be required anymore.

Currently, the portalUsername and portalPassword must be hardcoded in the values.yaml file. Starting with the next release, these credentials will be securely read from a Kubernetes secret instead.
b.manually: deploy the solution package and add the appid for client and cockpit to your values.yaml file
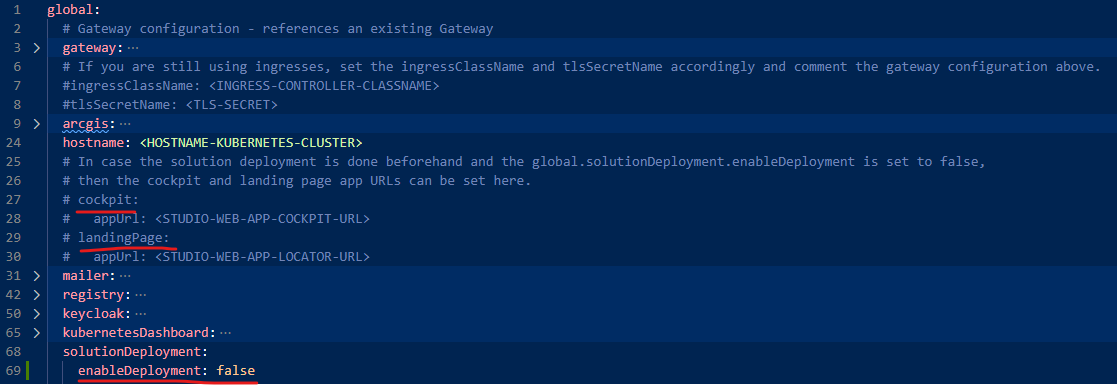
In this case make also sure you set the property global.solutionDeployment.enableDeployment to false
4.Login to the VertiGIS Container Registry
a.helm registry login vertigisapps.azurecr.io
5.Deploy version 1.9 using HELM.
helm upgrade <RELEASENAME> oci://vertigisapps.azurecr.io/network-locator/helm-chart \
--namespace <NAMESPACE> \
-f values.yaml \
--wait \
--version 1.9.0 \
--timeout 30m0s \
Configuration Changes
Consider which of the new Features you want to use and configure them according to your needs:
Error-Admin Template Update
The error-admin template has been enhanced to provide administrators with more detailed information when errors occur.
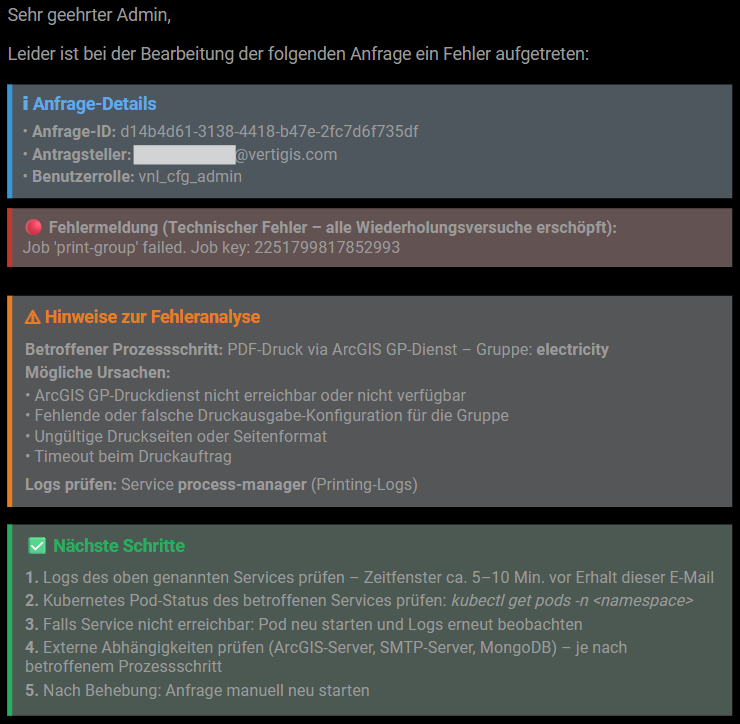
Please note that a Helm upgrade does not automatically update your existing templates. This is done intentionally to prevent overwriting any customizations you may have made.
If you want to benefit from these improvements, you must manually update the template:
•Copy the HTML snippet provided in the Error-Admin chapter.
•Replace your existing error-admin template in the Locator Admin App with this updated version.
dynamic_documents_number
There is a new variable called dynamic_documents_number which can be used in the mail and documents template.
Workflow Changes
There have been no changes to the VertiGIS Studio workflows used in Networks Locator in this release