This chapter outlines the configuration changes introduced in version 1.6 and provides step-by-step guide instructions for upgrading from version 1.5.
HELM Deployment
In previous releases, deploying Network Locator involved two steps:
1.Deploying the solution package
2.Using the generated app IDs for the locator client and the locator cockpit from step one in your values.yaml file for the Helm deployment
Starting with version 1.6, step one can now be integrated directly into the Helm deployment. If you prefer to deploy the solution package manually you can still do so by putting the appids directly into the values.yaml as before.
Step by Step Upgrade Instructions
1.Get your existing values.yaml file from the previous deployment
2.Back up your Process Manager, Storage, and Sync Service settings by saving the JSON config from the Admin Client to a local file—just in case.
3.Make sure you have a valid connection to your kubernetes cluster
4.Uninstall the Existing HELM Deployment: Run the following command to uninstall the current deployment:
helm uninstall <RELEASENAME> --namespace <NAMESPACE>
No data loss will occur during uninstallation. The Locator uses persistent volumes to store essential data, which will remain intact and be reused by the new version.
5.Decide whether you want to manually deploy the solution package or whether you want to HELM deployment to take care of it
a.via HELM: add this to your values.yaml directly under the global property:
solutionDeployment:
portalUrl: "{{ tpl .Values.global.arcgis.enterpriseUrl . }}/portal"
portalUsername: <PORTAL-USERNAME>
portalPassword: <PORTAL-PASSWORD>
webViewerUrl: <STUDIO-WEB-VIEWER-URL>
workflowDesignerUrl: <STUDIO-WORKFLOW-DESIGNER-URL>
webMapUrl: <WEBMAP-URL>
webViewerAccountId: <STUDIO-WEB-VIEWER-ACCOUNTID>
# https://<KUBERNETES-HOST>/api-network-locator-gateway
locatorUrl: <LOCATOR-URL>
# https://<KUBERNETES-HOST>/api-network-locator-gateway/history/FeatureServer/1
featureLayerUrl: <FEATURE-LAYER-URL>
Currently, the portalUsername and portalPassword must be hardcoded in the values.yaml file. Starting with the next release, these credentials will be securely read from a Kubernetes secret instead.
b.manually: deploy the solution package and add the appid for client and cockpit to your values.yaml file
In this case make sure you set the property global.solutionDeployment.enableDeployment to false
6.Login to the VertiGIS Container Registry
a.helm registry login vertigisapps.azurecr.io
7.Deploy version 1.6 using HELM:
helm install <RELEASENAME> oci://vertigisapps.azurecr.io/network-locator/helm-chart \
--namespace <NAMESPACE> \
-f values.yaml \
--wait \
--version 1.6.0 \
--timeout 15m0s \
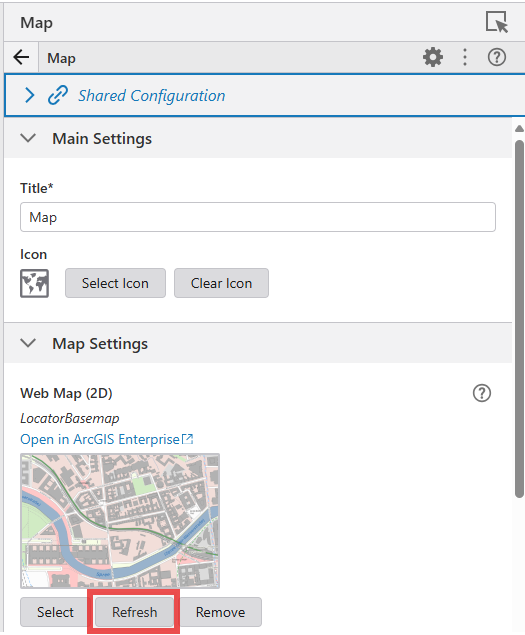
8.Start the Network Locator Client. If no map appears, open the Client App in Studio Web Designer and refresh the map component.
Configuration Changes
There are no mandatory changes to the configuration needed. Consider which of the new Features you want to use and configure them according the documentation:
2.Dynamic Text blocks in Prints
3.Layer intersection results in dynamic documents
4.Additional E-Mail Notifications
5.Layer specific agents for locked areas