A title block is a box that identifies information related to a floor plan drawing, such as its location, the name of the floor, the date, the scale, the author, and more. Any floor plan drawings you want to print should have a title block.
By default, title blocks appear on the bottom-right corner of a floor plan drawing, but the location can be specified when you create or edit the header.

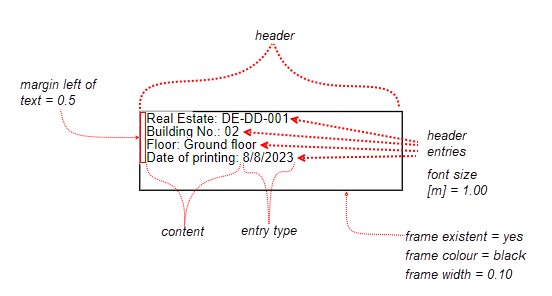
Sample Title Block on the Print View for a Floor Plan Drawing
In VertiGIS FM, you can create a title block for your drawings in two steps: first, create a header on the CAD Administration page. You then add header entries to the header based on the information you want the title box to include. Each header entry is a different text field and variable on the title block. The title block in the example above includes four header entries.
Title Block Header and Header Entries
After you've created the header and entries, you can select and activate the title block in the CAD Options section for the floor on which you want it to display.
Create a Title Block Header
To add a title block to a floor plan drawing, begin by creating a header. When you create the header, you specify the general appearance and positioning of the title box.
To Create a Title Block Header
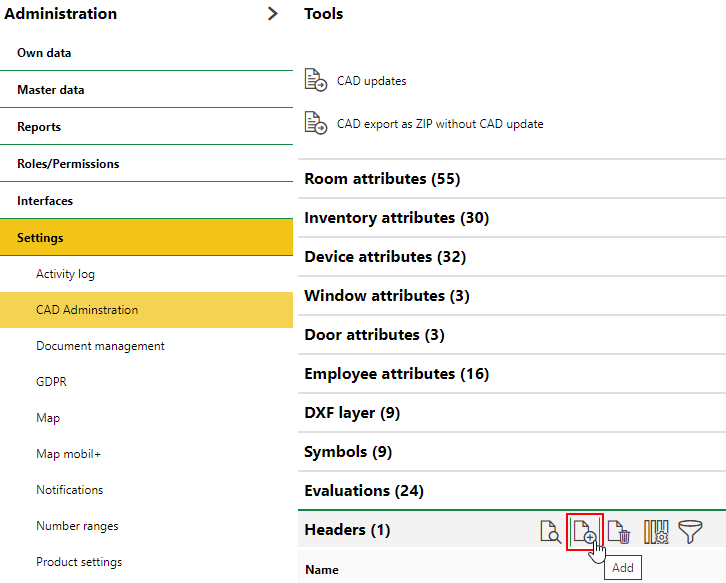
1.Navigate to the CAD Administration page (Administration > Settings > CAD Administration).
2.Expand the Headers section and click the Add (![]() ) icon.
) icon.
3.Fill out the fields in the Header form. Refer to Header Properties for guidance. You can save the form without filling out all the mandatory fields marked with an asterisk (*), but the title block will not appear on your drawings.
4.Click Save and Close.
Field |
Description |
|---|---|
Name |
A name for the title block. |
Position Is Relative |
A check box that, if selected, ensures the title block is aligned relative to the graphic in a way that makes it visible. If this option is not selected, the title block can end up outside of the field of view. |
Visible at Viewer |
A check box that, if selected, allows the title block to be visible in the floor plan viewer. |
Visible Within the Printable Area |
A check box that, if selected, ensures the title block is visible in the print preview. The print preview is viewed when you click the Print ( |
Visible Within Zooming Scale |
A check box that, if selected, ensures the title block is visible when a zoom scale applied to the floor is active. |
Leave Layout Data of Function Zoom Scale |
A check box that, if selected, makes the scale invisible on the drawing when a zoom scale is active. Select this option if you want to create a header entry for the zoom scale and do not want the scale to appear twice on the drawing. |
Column Limit of Entries |
The maximum number of columns the title block can have. |
Cell Limit of Entries |
The maximum number of rows the title block can have. |
Width [m] |
The width of the title block in meters. |
Height [m] |
The height of the title block in meters. |
Width of total zoom width in percent * |
A percentage of the width that the title block takes up when a zoom scale is active. |
Position is left |
A check box that, if selected, displays the title block on the left side of the drawing. Leaving this check box unselected means the title block will display on the right side of the drawing. |
Position is on top |
A check box, if selected, displays the title block on the top of the drawing. Leaving this check box unselected means the title block will display on the bottom of the drawing. |
Position left [m], absolute |
The distance in meters from the left edge of the page and the point at which you want the title box to appear. To use this property to specify the location of the title box, you must enter a value in the Position on top [m], absolute field. |
Position on top [m], absolute |
The distance in meters from the top of the page and the point at which you want the title box to appear. To use this property to specify the location of the title box, you must enter a value in the Position left [m], absolute field. |
Horizontal margin in percent |
A percentage value that specifies how far from the top of the drawing you want the title box to appear. Increasing the number for this value shifts the title box downward. |
Vertical margin in percent |
A percentage value that specifies how far from the left of the drawing you want the title box to appear. Increasing the number for this value shifts the title box rightward. |
Frame existent |
A check box that, if selected, creates a border around the title box. |
Frame colour |
When the Frame Existent check box is selected, the color of the border. |
Frame width [m] |
When the Frame Existent check box is selected, the width of the border. |
Backing existent |
When the Frame Existent check box is selected, whether the area contained within the border has a background. |
Background Colour |
When the Backing Existent check box is selected, the background colour. Alternatively, you can create the background colour for the cells containing the header entries. |
Add Entries to a Header
Once you've created a header for the title box, you can add entries to it. Add one entry for each data point you want the title box to reflect.
Entries are arranged in the header as table cells. When you created the header, you specified the maximum number of columns and rows the header has. When you add a new entry, you must assign it a column and header. If you want all the entries to be arranged as a vertical list in the title box, you would enter "1" in the Column of Header for each one, and enter a different ascending value in the Row of Header (1 for the first entry, 2 for the second entry, and so on).
To Add Entries to a Header
1.Navigate to the CAD Administration page (Administration > Settings > CAD Administration).
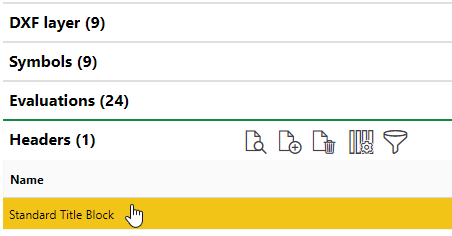
2.Expand the Headers section and double-click the header to which you want to add entries. If no header is present, create one.
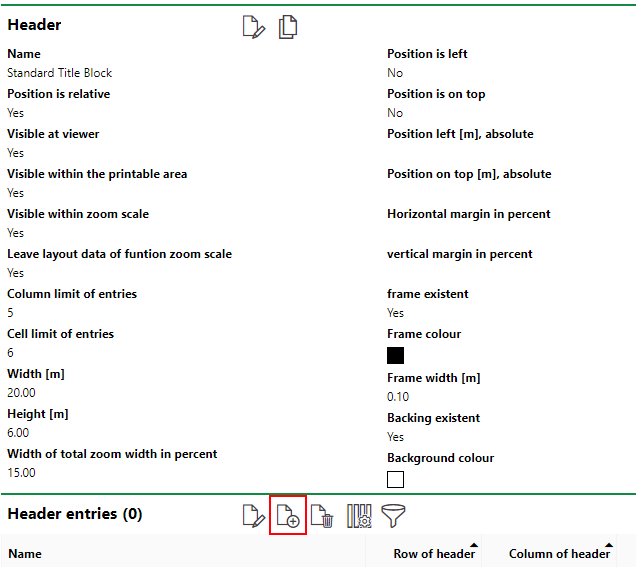
3.Expand Header Entries and click the Add (![]() ) icon.
) icon.
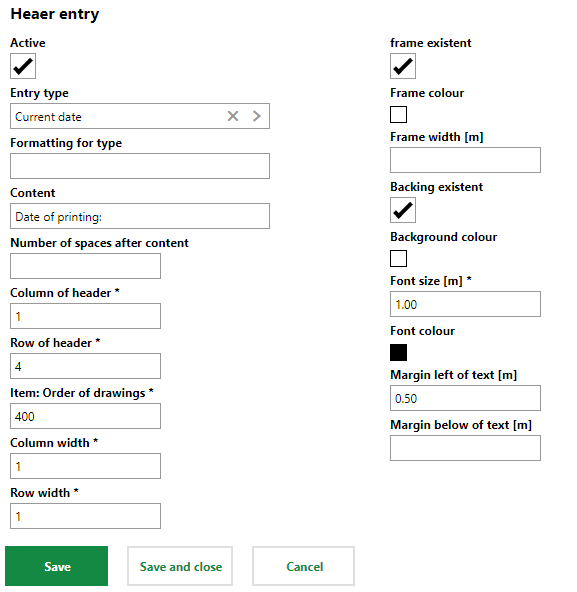
4.Fill out the fields in the Header Entry form. Refer to Header Entry Properties for guidance.
5.Click Save and Close.
Header Entry Properties
Field |
Description |
|---|---|
Active |
A check box that, if selected, makes the entry visible in the title box. Leave this check box unselected if you want to temporarily hide the entry from the title box on the drawing. |
Entry Type |
The data point reflected by the entry. This is a variable that will show different information depending on which floor plan drawing the user is viewing or printing. You can select from the following options: oCurrent user ("Aktueller Benutzer") oBuilding No. oComment on assessment of zoom scale oCompany logo oContent as Expression oContent with leading spaces oCurrent date oCurrent time oFloorname oLogo report oName of evaluation oName of real estate oNumber of floor oPlan identification oProperty designation oReal estate no. oThe content can be edited in the browser. |
Formatting for Type |
The format in the date or time will display if you select a date or time for the Entry Type. For example, if you select Current Date as the Entry Type, you may type "dd/mm/yyyy" as the Formatting for Type. In this example, August 8, 2023 would appear as 8/8/2023. |
Content |
The text string that will display before the entry type data. For example, if you select floorname as the Entry Type, you may type "Floor:" in the Content box. |
Number of spaces after content |
The number of spaces between the Content string and the Entry Type variable. |
Column of header * |
The column in which you want to place the entry. |
Row of header * |
The row in which you want to place the entry. |
Item: Order of drawings * |
The order in which you want entries placed in the same cell to appear. You do not need to enter anything in this text box unless you are placing multiple entries in the same table cell. |
Column width * |
How many columns you want an entry to be able to span. If your entries require more width than one column, enter a value greater than 1. If you enter 1, the text will only be displayed in one column. |
Row width * |
How many rows you want an entry to be able to span. If your entries require more width than one row, enter a value greater than 1. If you enter 1, the text will only be displayed in one line. |
Frame existent |
A check box that, if selected, creates a border around the entry. |
Frame colour |
When the Frame Existent check box is selected, the color of the border. |
Frame width [m] |
When the Frame Existent check box is selected, the width of the border. |
Backing existent |
When the Frame Existent check box is selected, whether the area contained within the border has a background. |
Background Colour |
When the Backing Existent check box is selected, the background colour. |
Font size [m] * |
The relative size of the font text. |
Font colour |
The colour of the font text. |
Margin left of text [m] |
The relative padding to the left of the text. If this value is 0 or left blank, the text for the entry will be flush with the cell frame. |
Margin below of text [m] |
The relative padding below the text. If this value is 0 or left blank, the text for the entry will be flush with the cell frame. |
Typically, title blocks comprise multiple entries.
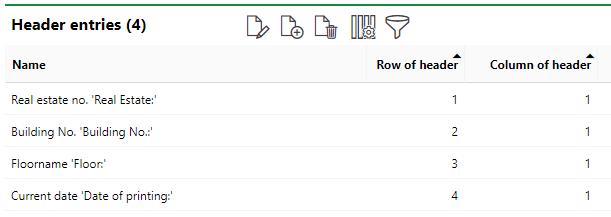
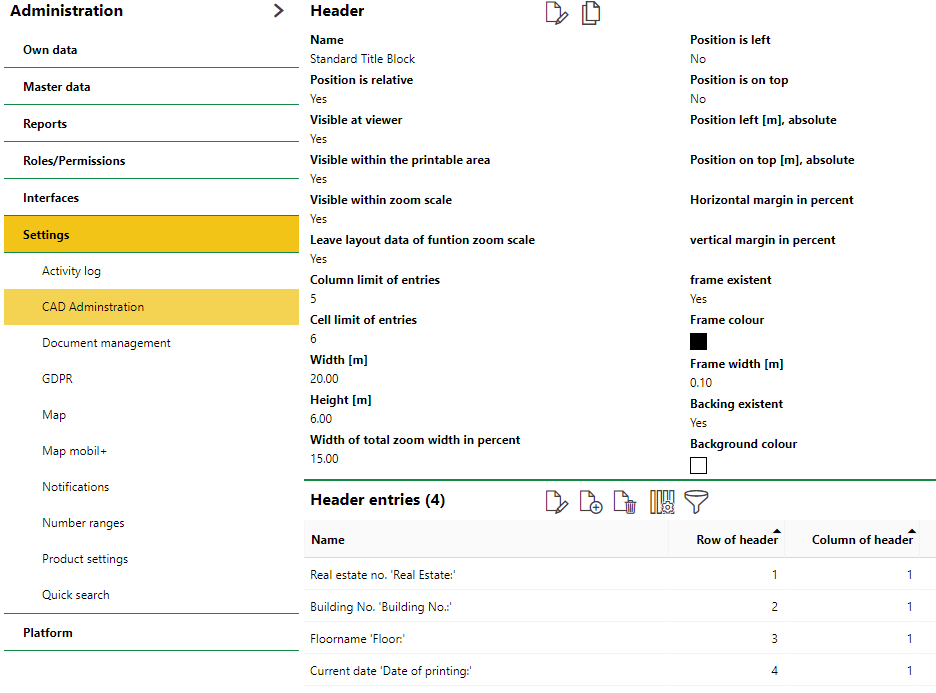
Entries Within a Header
Example
Title Block Header Comprising Four Entries
Assign a Title Block to a Floor
Once you've created a header, you can apply it to a floor plan by assigning its header to the floor. Headers are assigned at the floor level, in the CAD Options section on the floor details page. This allows you to create multiple headers and assign them to different floors.
To Assign a Title Block to a Floor
1.Navigate to the floor details page that has the floor plan to which you want to apply the title box.
2.Click the Edit (![]() ) icon to edit the floor details.
) icon to edit the floor details.
3.Expand the CAD Options tab.
4.Select the Header Active check box.
5.Click the arrow in the Header Selection box. The dialog that opens will list all the headers you've created. Select the header you want to assign to the floor and click Apply.
The CAD Options section does not show the Header Active and Header Selection fields if you have not created any headers.
6.Click Save and Close.
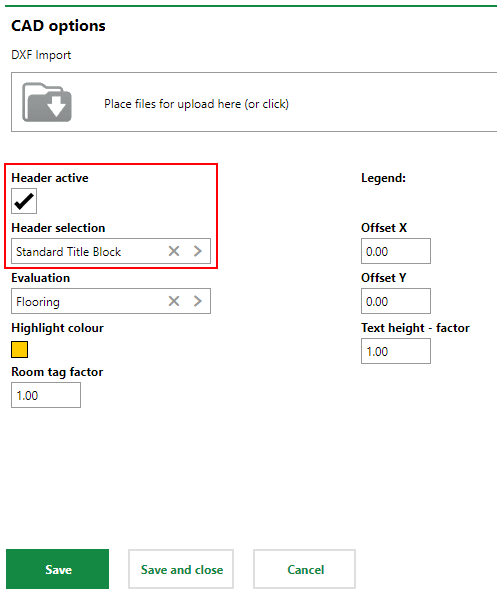
Controls for Assigning Header on CAD Options Tab