Using VertiGIS FM, you can display inventories and devices on any floor plan drawing that contains rooms. You can also create individual inventories and devices by including their data in a DXF file and importing it into VertiGIS FM as a floor plan, instead of creating inventories and devices manually.
Inventories and devices denoted in the DXF file do not need to have already been created in VertiGIS FM. If you intend to have the VertiGIS FM create the inventories and devices when you import the drawing into the system, assign the symbol to an inventory class instead of to individual inventories.
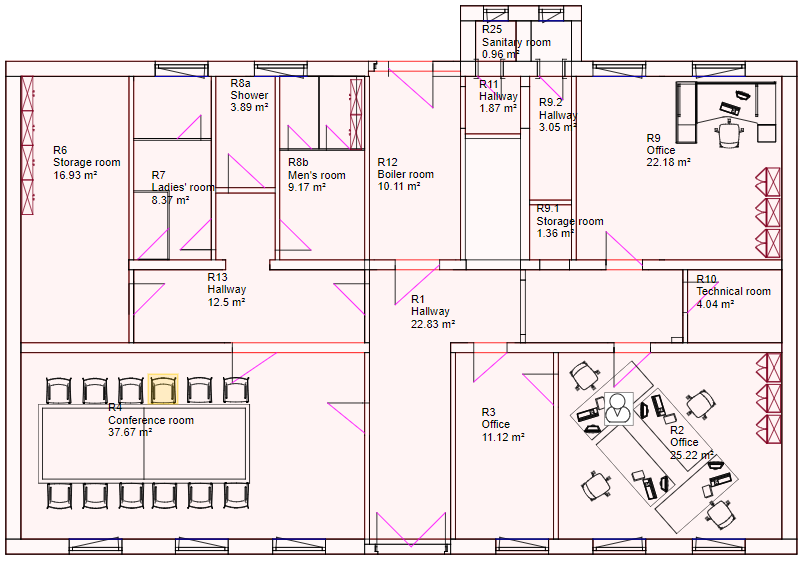
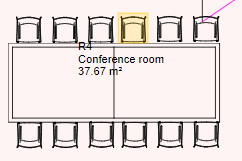
Inventories and Devices Displayed on a Floor Plan Drawing
Prerequisite Settings
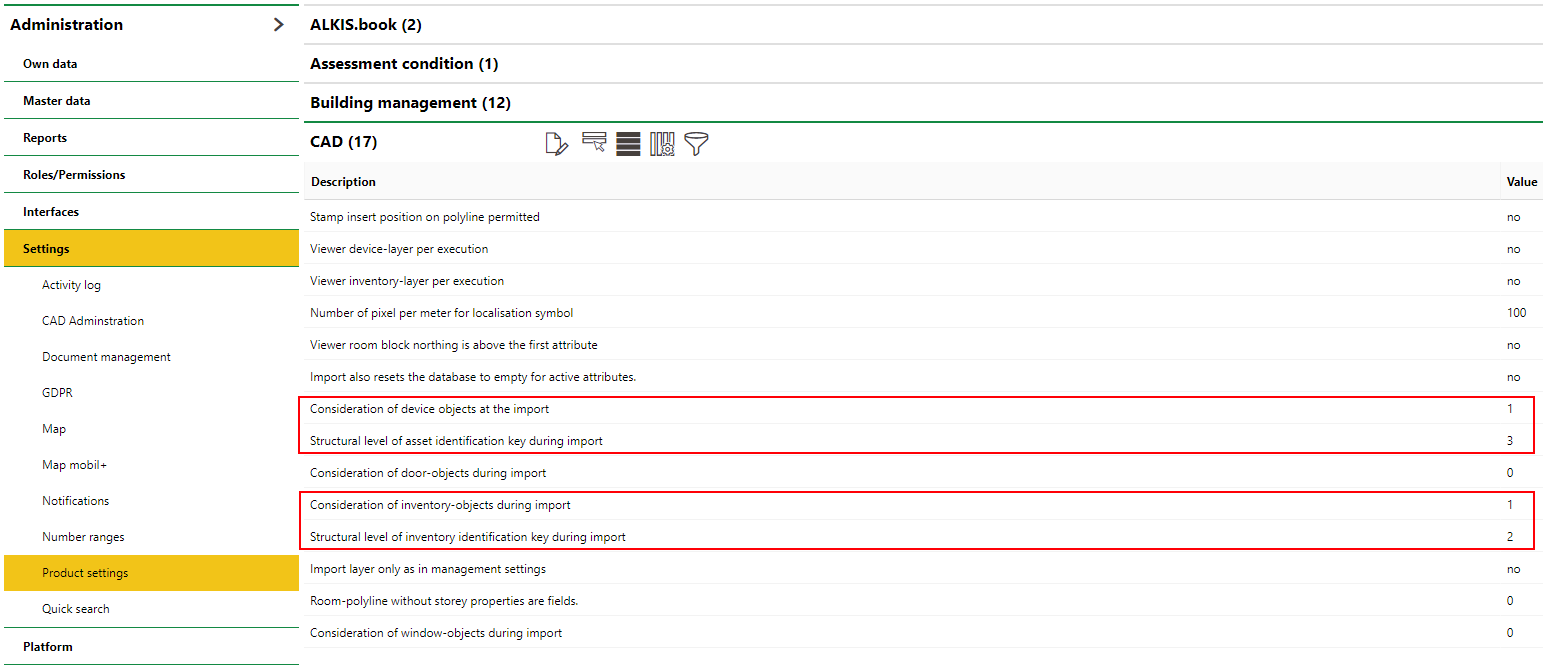
To import a floor plan drawing that represents devices and inventories in its rooms, you must configure the settings below as noted on the Administration > Settings > Product Settings page. Refer to CAD Settings for more information.
Setting |
Value |
|---|---|
Consideration of device-objects at the import |
1 |
Consideration of inventory-objects during import |
1 |
You can specify the number of levels in the device structure in the Structural level of asset identification key during import, and the number of levels in the inventory structure in the Structural level of inventory identification key during import. By default, these settings are configured for standard use.
CAD Settings Relevant to Inventory and Device Import
CAD Blocks
Blocks are used to designate inventory and devices in a floor plan drawing. In the DXF file, each block must have two attributes: ID and Type.
ID
The ID attribute determines whether the block is an inventory or a device.
Inventory
For an inventory, the ID attribute is the of the block is the inventory code (ICS) with the different elements separated by periods:
inventory class identifier.inventory performance identifier.inventory object identifier
An example of an inventory code as an ID attribute is 3.2.11.
Device
For a device, the ID attribute is the device's asset identification key with the device's group, designation, version, and object identifiers all separated by a period:
group key.designation key.version key.object key
Refer to the Building Service Structure for more information.
An example of asset identification as an ID attribute is AWG.AWA.ABS.1.
Type
The Type attribute is an open field in which you can enter any type value that describes the inventory or device. Examples could include chair or stapler.
Symbols
Inventories and devices are represented graphically on a floor plan by symbols. Symbols are images imported into VertiGIS FM and then assigned to inventory or device types. The symbol is shown on the floor plan drawing in the locations the inventories and devices are indicated as being present.
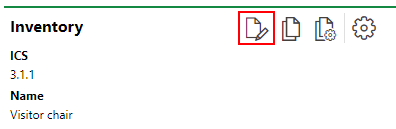
Symbol Assigned to the Inventory for Chairs
Symbol images are imported into VertiGIS FM as simple DXF drawings that consist only of lines.
Create a Symbol
You must upload a file for the symbol and give it a name before you can assign it to the inventories and devices you want to show on a floor plan. Refer to Create a Symbol for more information.
Assign Symbol to Inventories
You can assign a symbol to an inventory or inventory class by editing the details page and selecting the symbol from the Icon drop-down menu. The location of the Icon menu varies depending on whether you are assigning the symbol to an individual inventory or an inventory class.
To Assign a Symbol to an Inventory
1.On the Inventory start page, click Inventory Structure under Actions.
2.Under Inventory Types, double-click an inventory type.
3.Under Types, double-click an inventory type again.
4.Under Objects, double-click an inventory.
5.On the inventory details page, click the Edit (![]() ) icon.
) icon.
6.Expand the Technical Characteristics tab.
7.From the Icon drop-down menu, select the symbol you want to assign to the inventory.
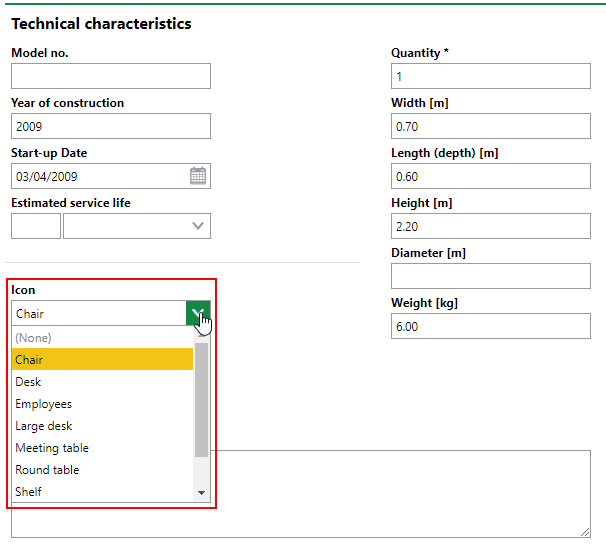
8.Click Save and Close.
To Assign a Symbol to an Inventory Class
1.On the Inventory start page, click Inventory Structure under Actions.
2.Under Inventory Types, double-click an inventory type.
3.Under Types, double-click an inventory type again.
4.On the inventory class details page, click the Edit (![]() ) icon.
) icon.
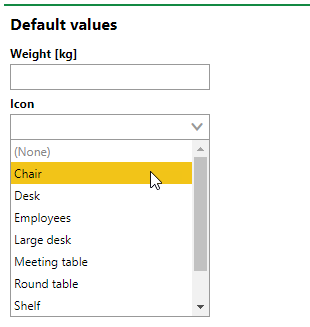
5.Expand the Default Values tab.
6.From the Icon drop-down menu, select the symbol you want to assign to the inventory.
7.Click Save and Close.
Assign Symbol to Devices
You can assign a symbol all instances of a device on its version details page, or to one individual device on the device details page.
To Assign a Symbol to a Device Version
1.In VertiGIS FM Maintenance, navigate to the version details page for the device you want the symbol to represent.
2.Click the Edit (![]() ) icon to edit the version details.
) icon to edit the version details.
3.Expand the Default Values tab.
4.From the Icon drop-down menu, select the symbol you want to assign to the version.
5.Click Save and Close.
If you do not see the Icon menu in the Default Values tab, you may need to edit the user privileges for the page and change Icon to Write/Read.
To Assign a Symbol to a Device
1.In VertiGIS FM Maintenance, navigate to the device details page.
2.Click the Edit (![]() ) icon to edit the device details.
) icon to edit the device details.
3.Expand the Technical Characteristics tab.
4.From the Icon drop-down menu, select the symbol you want to assign to the device.
5.Click Save and Close.
Importing a Drawing with Inventories and Devices
When you import a floor plan drawing with inventories and devices included in the rooms, the system can programmatically create the items if you have not already done so manually in VertiGIS FM.
Relocate Inventories and Devices on a CAD Drawing
You can change the location of inventories and devices in VertiGIS FM by moving them on the floor plan locally and re-importing the drawing into the application.. Moving objects this way programmatically updates the location data of the object.
To Relocate Inventories and Devices on a Floor Plan Drawing
1.Navigate to the floor details page on which the CAD drawing was imported.
2.Edit the floor details. Expand the CAD Options tab and click DXF Download.
3.Save the drawing as a DXF 2000 file and open it in your CAD software application.
4.In your CAD software application, re-arrange the objects as desired. When you're finished, save the drawing as a DXF 2000 file.
5.Return to the CAD Options tab on the edit floor details page. Import the updated CAD drawing you saved locally.
The floor plan drawing in the CAD section on the floor details page should now reflect the updated room location of any inventories or devices you moved.
On the details page for the device or inventory, the Locations section should now reflect the room to which the object was moved. The Until column for the old location should programmatically update to reflect the date the updated drawing was imported.
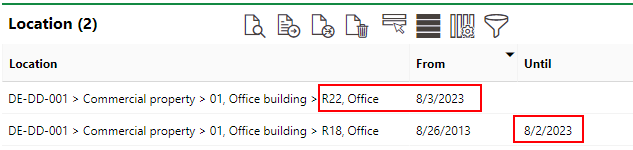
Location Section on the Device Details Page Reflecting the Device's New Location from an Updated CAD Drawing