Accessed from within a VertiGIS Studio Web application, Networks Locator enables automated intake of locates requests from 811 providers, streamlined dispatch management, and the ability to view locate boundaries alongside plant maps.
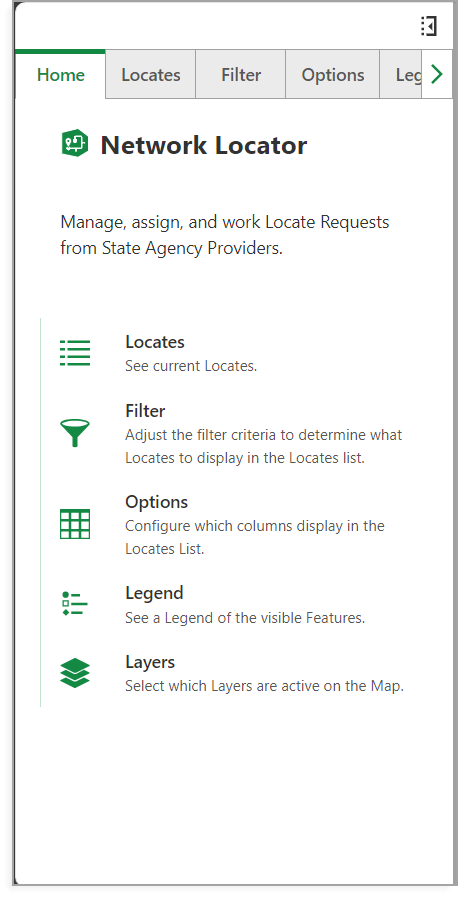
Network Locator menu
How does it work?
Networks Locator receives all locate request emails from a client’s configured 811 agencies and automatically creates corresponding locate tasks. Users can qualify and manage all locates tasks within Networks Locator.
Networks Locator Guiding Values
•Risk Reduction: Ensures correct receipt, processing, and mapping of 811 emails in real time.
•Employee Efficiency: Provides a central, easy-to-use platform to view and manage all locate requests.
•Business Continuity: Serves as a single source of truth and protects against “brain drain” with turnover or retirement.
•Auditing and Reporting: Tracks all activity and provides access to historical data and metrics.
Overview
Networks Locator receives all locate request emails from one-call agencies and automatically creates corresponding locate tasks. Users can view and manage all locates tasks in one interface, layered on top of their network maps. From receipt to dispatch, Networks Locator reduces the time associated with evaluating a locate request to no more than 5 minutes. From there, locators can view and complete tasks with their mobile device quickly, accurately, and effectively.
Networks Locator has five sections as shown below.
1.SaaS email processing and 811 agency communication architecture.
2.APIs for locate data integration.
3.Browser-based GUI for dispatchers and locators.
4.User administration site for managing access and notifications.
5.Hosted Networks Locator Reports site and API.
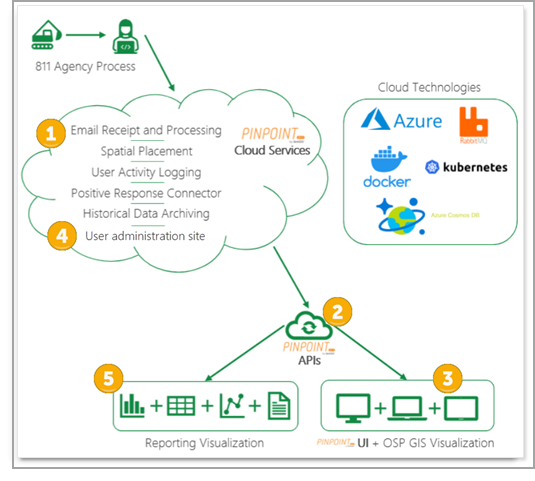
Five sections of Networks Locator
Networks Locator Workflow
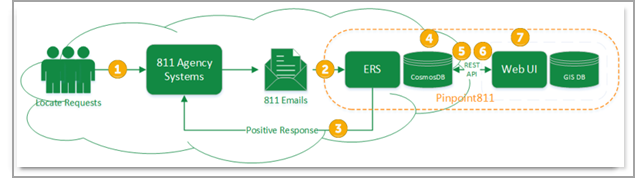
General Workflow of Networks Locator
The following steps show the Networks Locator workflow:
1.A locate request is submitted to the 811 agency.
2.The cloud-based Email Receipt System (ERS) receives the forwarded email from the 811 agency.
3.The ERS sends a positive response back to the 811 agency.
4.The email is forwarded to the Azure Cosmos database, where it is parsed.
5.The parsed data is used by Cosmos to communicate with the API system.
6.The API queries the Network Locates Cloud for the locate data.
7.The GIS database information is merged with the locate data in the Web UI to be seen by the end user.
Deployment Process Notes:
•Clients set up a forwarding rule that routes all emails they receive from the 811 agency (or agencies) to the Networks Locator inbox established by VertiGIS.
•During the deployment process, the Technology team will create an email inbox following this format: clientname@Pinpoint811.vertigis.com.
•Typically, the project manager communicates with the client’s IT group to establish the forwarding rule.
•Once the rule is in place, all 811 emails that come to the Networks Locator inbox for that client flow into the cloud server’s view of Networks Locator as locate requests.