Web Services
Create a YAML Configuration File
For the deployment of the web services, you need to prepare a YAML configuration file to tailor your Network Locator deployment to the specifics of you own environment.
Copy the below values.yaml file and save it to a local copy. Then adapt all the <VARIABLES> to match your environment.
Use a sufficiently long password for Keycloak PostgreSQL to prevent authentication failures due to password length restrictions.
values.yaml
global:
nodeSelector:
"kubernetes.io/os": linux
tolerations: []
affinity: {}
# Gateway configuration - references an existing Gateway
gateway:
name: <GATEWAY-NAME>
namespace: <GATEWAY-NAMESPACE>
# If your gateway has multiple listeners and you want to use a specific one, set the sectionName or port accordingly.
#sectionName: <GATEWAY-LISTENER-NAME>
#port: <GATEWAY-LISTENER-PORT>
# If you are still using ingresses, set the ingressClassName and tlsSecretName accordingly and comment the gateway configuration above.
#ingressClassName: <INGRESS-CONTROLLER-CLASSNAME>
#tlsSecretName: <TLS-SECRET>
arcgis:
enterpriseUrl: <ENTERPRISE-BASE-URL>
portalUrl: "{{ tpl .Values.global.arcgis.enterpriseUrl . }}/portal"
serverUrl: "{{ tpl .Values.global.arcgis.enterpriseUrl . }}/server"
webMapId: <WEBMAP-ID>
# if portalSecretName is set, the portalUsername, portalPassword and apiKey above are ignored
# the portal secret can be created either with username/password or api-key
# kubectl create secret -n <NAMESPACE> generic <PORTAL-SECRET-NAME> --from-literal=username=<PORTAL-USER-NAME> --from-literal=password=<PORTAL-USER-NAME-PASSWORD>
# kubectl create secret -n <NAMESPACE> generic <PORTAL-SECRET-NAME> --from-literal=api-key=<ARCGIS-API-KEY>
# portalSecretName: <PORTAL-SECRET-NAME>
# portalUsername: <PORTAL-USER-NAME>
# portalPassword: <PORTAL-USER-NAME-PASSWORD>
# the API-Key needs to be generated in ArcGIS Portal and needs to be given the necessary permissions
apiKey: <ARCGIS-API-KEY>
hostname: <HOSTNAME-KUBERNETES-CLUSTER>
# In case the solution deployment is done beforehand and the global.solutionDeployment.enableDeployment
# is set to false, then the cockpit and landing page app URLs can be set here.
# cockpit:
# appUrl: <STUDIO-WEB-APP-COCKPIT-URL>
# landingPage:
# appUrl: <STUDIO-WEB-APP-LOCATOR-URL>
mailer:
# if secretName is set, the host, ssl, startTls, port, username, password and from are ignored
# kubectl create secret -n <NAMESPACE> generic <MAILER-SECRET-NAME> --from-literal=host=<HOSTNAME-MAIL-SERVER> --from-literal=ssl=false --from-literal=start-tls=OPTIONAL --from-literal=start-tls-enabled=true --from-literal=port=587 --from-literal=username=<USERNAME-MAIL-SERVER> --from-literal=password="<PASSWORD-MAIL-SERVER>" --from-literal=from=<FROM-MAIL-ADDRESS>
#secretName: <MAILER-SECRET-NAME>
host: <HOSTNAME-MAIL-SERVER>
ssl: false
startTls: OPTIONAL
port: 587
username: <USERNAME-MAIL-SERVER>
password: <PASSWORD-MAIL-SERVER>
from: <FROM-MAIL-ADDRESS>
registry:
url: vertigisapps.azurecr.io
# if secretName is set, the username and password are ignored
# if you define a secret for the container registry, update also the camunda-platform.global.image.pullSecrets accordingly
# kubectl create secret -n <NAMESPACE> docker-registry <REGISTRY-SECRET-NAME> --docker-server=vertigisapps.azurecr.io --docker-username=<USER-NAME> --docker-password=<PASSWORD>
# secretName: <REGISTRY-SECRET-NAME>
username: <USER-NAME>
password: <PASSWORD>
kubernetesDashboard:
enableDeployment: false
restrictToNamespace: true
solutionDeployment:
enableDeployment: true
portalUrl: "{{ tpl .Values.global.arcgis.enterpriseUrl . }}/portal"
portalUsername: <PORTAL-USERNAME>
portalPassword: <PORTAL-PASSWORD>
webViewerUrl: <STUDIO-WEB-VIEWER-URL>
workflowDesignerUrl: <STUDIO-WORKFLOW-DESIGNER-URL>
webMapUrl: <WEBMAP-URL>
webViewerAccountId: <STUDIO-WEB-VIEWER-ACCOUNTID>
locatorUrl: <LOCATOR-URL>
featureLayerUrl: <FEATURE-LAYER-URL>
keycloak:
auth:
adminUser: <ADMIN-USERNAME>
adminPassword: <ADMIN-PASSWORD>
# instead of setting the adminPassword, a secret can be used
# kubectl create secret -n <NAMESPACE> generic <KEYCLOAK-ADMIN-PASSWORD-SECRET-NAME> --from-literal=<KEYCLOAK-ADMIN-PASSWORD-SECRET-KEY>=<ADMIN-PASSWORD>
# existingSecret: <KEYCLOAK-ADMIN-PASSWORD-SECRET-NAME>
# passwordSecretKey: <KEYCLOAK-ADMIN-PASSWORD-SECRET-KEY>
postgresql:
auth:
username: <USERNAME>
password: <PASSWORD>
# instead of setting the password a secret can be used
# kubectl create secret -n <NAMESPACE> generic <KEYCLOAK-PG-SECRET-NAME> --from-literal=password=<PASSWORD> --from-literal=postgresql-password=<PASSWORD>
# existingSecret: <KEYCLOAK-PG-SECRET-NAME>
# Kubernetes Dashboard configuration
kubernetes-dashboard:
app:
settings:
global:
defaultNamespace: <NAMESPACE>
namespaceFallbackList:
- <NAMESPACE>
camunda-platform:
global:
image:
registry: vertigisapps.azurecr.io
# If you defined a secret for the container registry in global.registry.secretName, use the same here
# pullSecrets:
# - name: <REGISTRY-SECRET-NAME>
networks-dxf-export:
registry:
url: vertigisapps.azurecr.io
# if secretName is set, the username and password are ignored
#secretName: <REGISTRY-SECRET-NAME>
username: <USER-NAME>
password: <PASSWORD>
|
Create Kubernetes Deployment
For the final deployment execute the following commands:
helm install
<release-name>
oci://vertigisapps.azurecr.io/network-locator/helm-chart
--namespace <name of kubernetes namespace>
-f values.yaml
--wait
--version 1.10.0
|
This command may take up several minutes to complete.
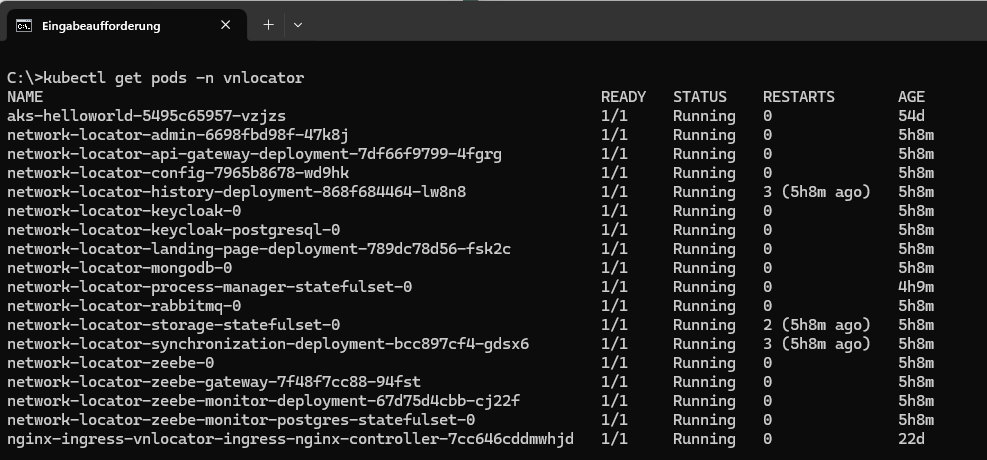
kubectl get pods -n <name of kubernetes namespace>
|
After executing this command, you should a screen similar to that in the figure below.
You have now successfully deployed the Network Locator Web Services. You can now proceed with the configuration of the solution.